Welcome to the definitive guide for transforming your online academy into a highly profitable subscription business. The digital education landscape is shifting rapidly, and while learning how to create online class funnels provides a great starting point, building a truly sustainable and predictable revenue stream requires a robust wordpress lms membership architecture. If you are tired of piecing together disjointed tools and facing constant technical friction, finding a truly integrated LMS ecosystem is your next step, and the newly released Memberships & Subscriptions Add-on for LearnPress is the ultimate solution you have been waiting for.
This comprehensive guide will walk you through setting up a complete wordpress lms membership platform from scratch. Whether you are looking to build a straightforward community environment or a highly complex lms with membership and file sharing functionality, this tutorial covers every single step in detail. Grab a cup of coffee, and let us dive directly into the ultimate wordpress lms membership setup process designed to maximize your e-learning revenue.
Table of Contents
LearnPress – WordPress LMS Plugin
We provide an amazing WordPress LMS plugin to create & sell online courses. Let’s find out!
Try NowWhy You Need a Native E-Learning Subscription System
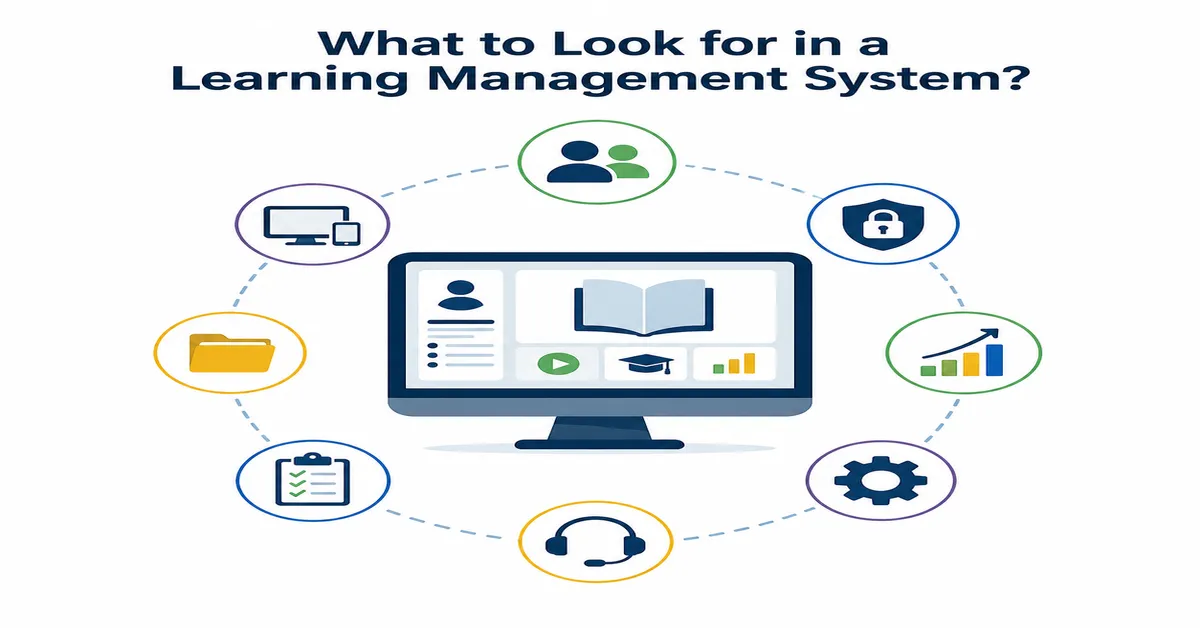
Before diving into the technical configurations, it is crucial to understand why a native wordpress lms membership system outshines external, third-party alternatives. When digital educators attempt to patch together a generic wp membership plugin, they frequently encounter severe synchronization issues between user roles, payment gateways, and course access restrictions. Evaluating various membership plugins usually reveals that standard tools lack deep hooks into quiz data or curriculum completion metrics.
A native wordpress lms membership add-on eliminates these frustrating friction points. It connects directly with your existing LearnPress database, ensuring that enrollments, student progress, and access rights are perfectly aligned. Furthermore, if you plan to scale your business by selling premium content, you absolutely need a reliable wordpress membership plugin with payment gateway integration to handle automated, recurring billing cycles securely.
Instead of forcing a generic woocommerce membership plugin to recognize your specific educational content and lesson structures, this new add-on is purpose-built strictly for educators. Rather than browsing external Ecommerce LMS suites, you can easily restrict access to video lessons, quizzes, and downloadable materials, effectively creating a powerful lms with membership and file sharing functionality that keeps your students deeply engaged and subscribed month after month.
Step 1: Navigating the Centralized Dashboard
The journey to launching a profitable wordpress lms membership site begins right inside your WordPress admin panel. After you have successfully installed and activated the new add-on, locate the LearnPress menu on your left-hand sidebar and click on the newly added Memberships tab.
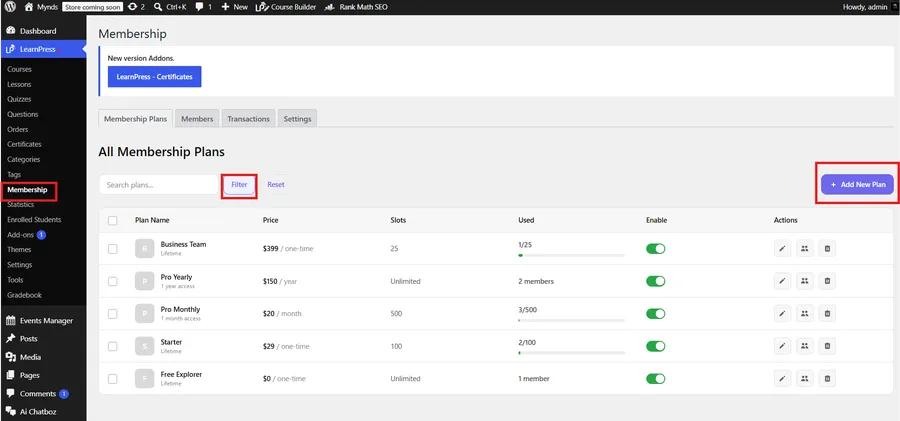
You will be immediately greeted by a clean, centralized “All Membership Plans” dashboard. Unlike a clunky, outdated wp membership plugin that spreads settings across dozens of confusing pages, this native interface gives you a clear, bird’s-eye view of your entire subscription business. This update fits perfectly alongside the new course builder interface to bring maximum clarity. From this single screen, you can easily monitor all your active tiers, check their current pricing models, view slot limits, and see exactly how many members are currently enrolled in each package. Managing a wordpress lms membership business has truly never been more intuitive. To start building your first subscription tier, simply click the purple + Add New Plan button located in the top right corner of the screen.
Step 2: Configuring Pricing and Billing Types
Once you are inside the plan creation screen, it is time to define your core financial models. Fully understanding your LMS pricing variables is critical before defining these parameters. The very first step is to enter your Plan Name (e.g., “Pro Monthly,” “Basic Tier,” or “Lifetime Access”).
After naming your plan, it is time to define your core financial models. The Billing Type section provides the structural backbone for your site. You are presented with two distinct, highly flexible options to monetize your educational content:
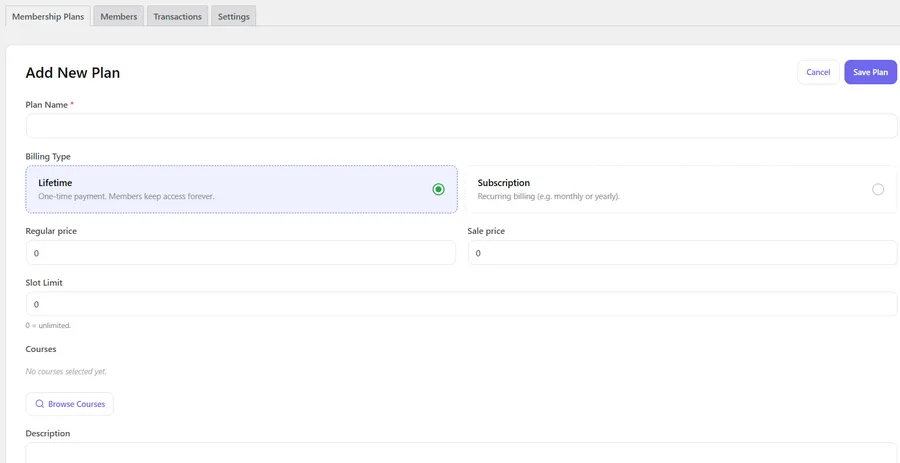
Option 1: Lifetime Billing (One-Time Payment) Select the Lifetime radio button if you want to offer a traditional model where members pay once and keep their access forever. Here is exactly how to fill out the corresponding fields:
- Regular price: Enter your standard one-time fee here (e.g., “199”). If you are creating a completely free membership tier, simply enter “0”.
- Sale price: If you are running a promotional campaign, enter the discounted price here (e.g., “149”). If there is no discount, leave it as “0”.
- Slot Limit: Enter the maximum number of members allowed to purchase this specific plan. If you want to allow unlimited enrollments, leave the input as “0”.
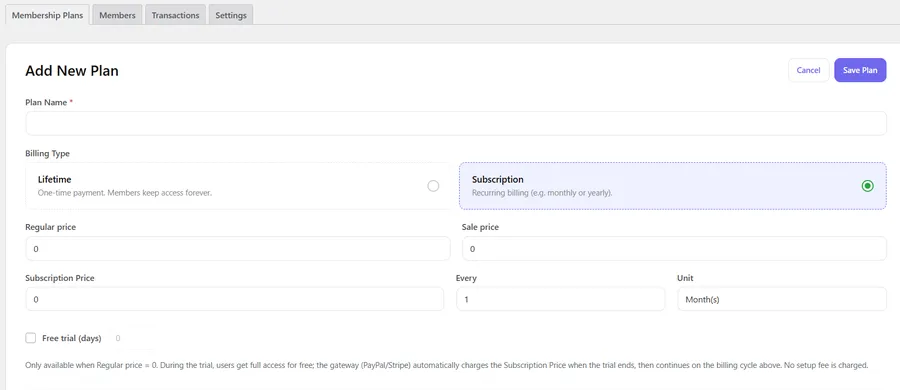
Option 2: Subscription Billing (Recurring Revenue) Select the Subscription radio button to generate predictable, recurring revenue (e.g., monthly or yearly). When selected, new configuration fields will dynamically appear on your screen:
- Regular price & Sale price: For a standard recurring membership, you will typically leave the Regular price at “0”.
- Subscription Price: Enter the exact amount you want to charge your students per billing cycle (e.g., “29”).
- Every & Unit: This combination defines your billing frequency. For a standard monthly plan, type “1” in the Every box and select “Month(s)” from the Unit dropdown. For an annual plan, you would type “1” and select “Year(s)”.
- Free trial (days): To significantly lower the barrier to entry, check this box and enter the number of trial days you want to offer (e.g., “7”).
- Important Free Trial Rule: As explicitly noted in the dashboard instructions, the free trial is only available when the Regular price is set to “0”. During this promotional period, users get full access to the platform for free. Once the exact trial timeframe ends, the gateway (PayPal/Stripe) automatically charges the Subscription Price and continues on the billing cycle you defined above without charging any initial setup fees.
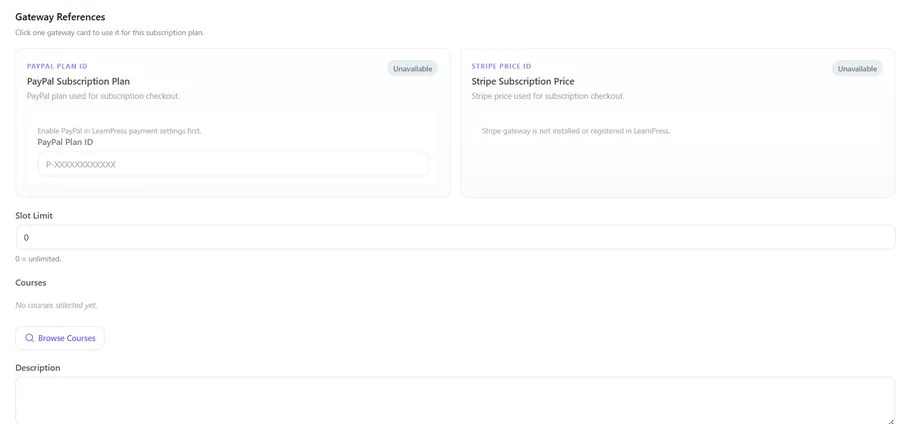
For subscription-based plans, the interface dynamically reveals a Gateway References section. Because this system operates as a highly secure wordpress membership plugin with payment gateway integration, you must link your external payment plans here to authorize automated recurring checkouts. Here is how to configure it:
- PayPal / Stripe Cards: Click on the specific gateway card you wish to use. For example, if you click PayPal, you will see a field for the PayPal Plan ID. Note the built-in warning: you must enable PayPal in the core LearnPress payment settings first. Once enabled, paste your exact Plan ID (which typically looks like
P-XXXXXXXXXXXX) into the box. If you use Stripe, input your Stripe Price ID (if the card says “Unavailable,” it means you need to install the Stripe add-on first). - Slot Limit: Next, you can set an enrollment cap. As the dashboard notes, you can leave it at “0” for unlimited student enrollments. Alternatively, input a specific small number (e.g., “50”) to create psychological urgency and exclusivity for your high-ticket tiers.
- Description: Finally, scroll down to the Description text box. Add a brief, enticing summary of what this plan offers.
Once these fields are filled out, your wordpress lms membership platform is ready to process monthly or yearly renewals flawlessly without any manual intervention. Click Save Plan, and let’s move on to the most exciting part: assigning your courses!
Step 3: Assigning Courses and Exclusive Content
Setting up the pricing infrastructure is only one side of the equation; delivering undeniable value is the other. Scroll down in the plan settings page until you reach the “Included Courses” section. With a simple, intuitive click, you can browse your entire existing LearnPress course library and assign specific educational tracks directly to this new membership tier. Managing this is heavily supported by the upgraded Curriculum Editor, allowing you to rearrange the order of the included courses using a smooth drag-and-drop interface to guide the student’s learning path.
By natively grouping your courses together under a single billing umbrella, you instantly establish a secure lms with membership and file sharing functionality. Only active, paying members of this specific plan will be able to access the associated video lessons, private PDF attachments, and interactive quizzes. This native approach is vastly superior and much cleaner than trying to hack together a standard wp membership plugin just to protect individual custom post types.
You can strategically create a highly accessible “Starter Plan” with basic introductory courses, alongside a high-ticket “Pro Plan” that unlocks your entire digital academy. Implementing a logically structured wordpress lms membership hierarchy like this empowers you to scale your product offerings and dramatically increase your customer lifetime value.
Step 4: Managing Members and Tracking Transactions
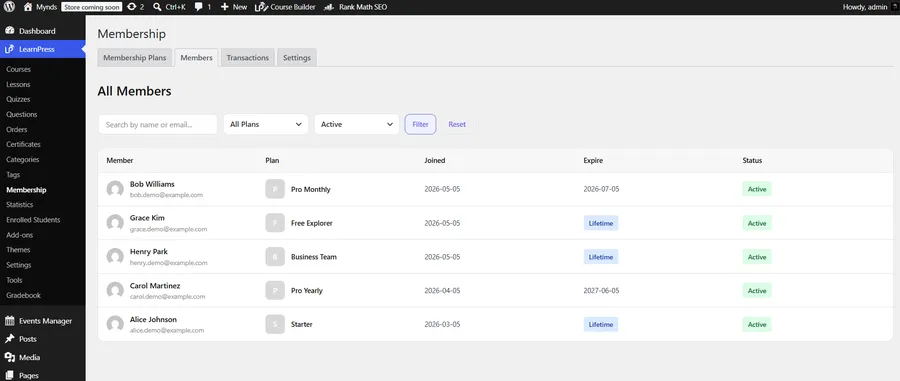
Once your curated plans are published and live, managing your growing community of students becomes entirely effortless. By navigating to the Members tab at the top of the interface, you get a comprehensive, detailed list of all enrolled users. This enables you to audit profiles much faster than using a standalone LearnPress Gradebook. You can instantly see exactly which plan they belong to, analyze their join and expiration dates, and check their precise current status—whether they are Active, Expired, Cancelled, Suspended, or enjoying a Lifetime plan.
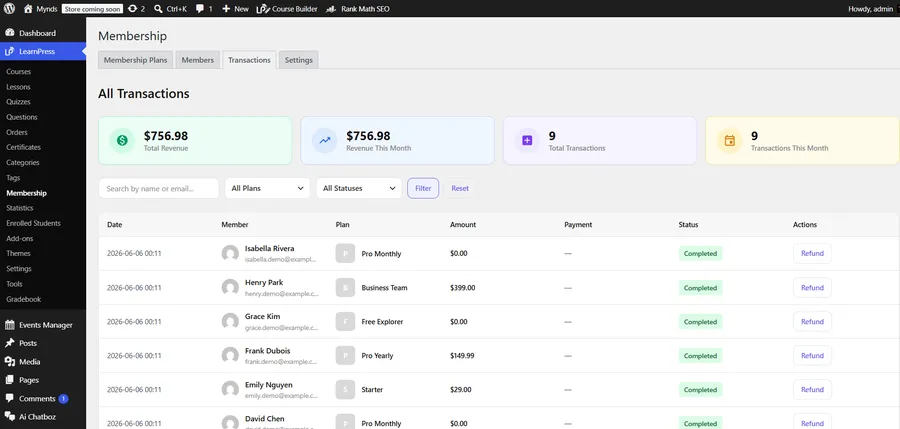
To closely monitor your financial growth and business health, switch over to the Transactions tab. Here, a beautifully clean analytics dashboard prominently displays your Total Revenue and Total Transactions for the current month. For webmasters who are accustomed to wrestling with a complex woocommerce membership plugin, you will deeply appreciate how natively and smoothly this data integrates with the core LearnPress ecosystem.
Conducting a thorough platform comparison will show that built-in logs protect data integrity better than fragmented extensions. It matches the robust order management flexibility of a top-tier woocommerce membership plugin, allowing you to effortlessly utilize hidden membership products, direct buy URLs, and comprehensive order tracking. You retain complete, uncompromised control over your financial data. You can filter the detailed transaction list by specific membership plans or easily sort them by payment statuses such as Completed, Pending, Refunded, or Failed, making accounting incredibly straightforward.
Step 5: Automating Lifecycles and Email Notifications
A true wordpress lms membership site should run almost entirely on autopilot, freeing you up to focus on creating new content rather than doing administrative chores. To configure your background automation rules, head over to the Settings tab. If you want to eliminate technical administrative tasks, utilizing smart MCP integration models can help, but the core settings tab handles the bulk of your operations. Under the Subscription settings area, you can immediately enable “Automatic Expiration” and dictate exactly what the system should do when a plan reaches its end date. For example, you can explicitly set the system to automatically “Revoke course access” the exact moment a subscription legitimately expires.
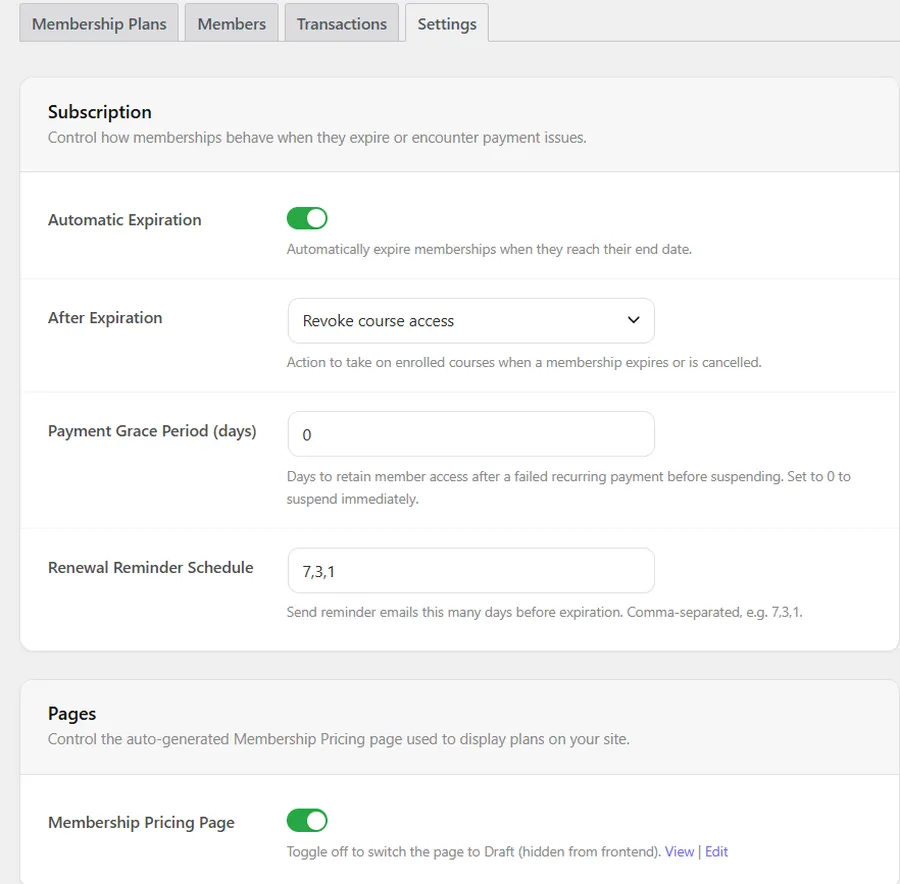
Because this powerful add-on functions as an advanced wordpress membership plugin with payment gateway, it gracefully and professionally handles unexpected billing hiccups. You can set a customized “Payment Grace Period” (measured in days) to temporarily retain a member’s access if their recurring credit card payment fails before the system finally suspends them. This is an absolutely critical retention feature for any reliable wordpress membership plugin with payment gateway designed to combat and reduce involuntary customer churn. Furthermore, you can proactively input a comma-separated “Renewal Reminder Schedule” (e.g., 7, 3, 1) to send out automated, friendly warnings via email before their access officially expires.
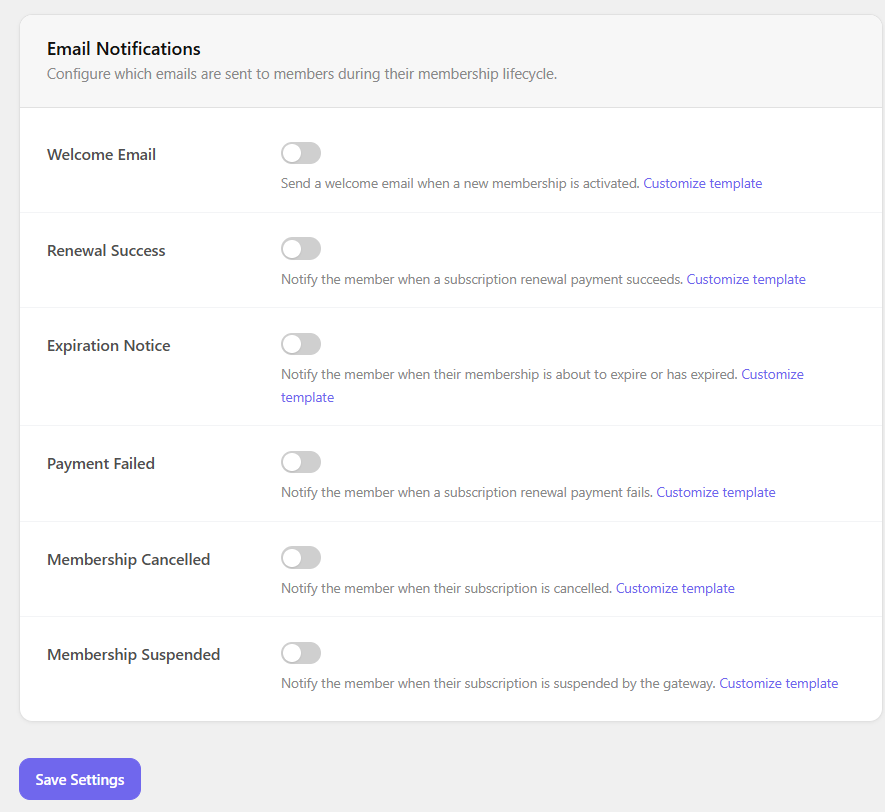
Finally, proactive communication is the golden key to retaining loyal subscribers for years. While upgrading your system with a fresh quiz update layout keeps tests engaging, automatic emails keep the business running smoothly. Scroll further down the page to the Email Notifications section. Here, you can easily toggle on or off automated emails and visually customize the HTML templates for critical lifecycle events. This includes sending out Welcome Emails, Renewal Success alerts, Expiration Notices, Payment Failed notifications, Membership Cancelled notifications, and Membership Suspended notifications.
Advanced Strategies for Scaling Your E-Learning Business
Now that the solid technical foundation of your wordpress lms membership platform is perfectly set, it is time to look at strategies for scaling. The digital education market is highly competitive, and simply offering a subscription package is rarely enough to guarantee success. You must leverage the native tools at your disposal to maximize engagement and learn how to promote course packages aggressively through content marketing.
First, consider the power of content dripping. While the core add-on securely restricts access, combining it with a strategic release schedule keeps members happily subscribed for much longer periods. By actively curating an lms with membership and file sharing functionality, you can regularly release exclusive PDFs, worksheets, templates, and bonus tutorial videos to active subscribers on a strict monthly basis. This continuous, predictable value addition completely justifies the recurring monthly fee in the eyes of the consumer.
Second, continuously analyze your frontend checkout flows. A seamless, frictionless checkout experience directly minimizes cart abandonment rates. Because this extension routes your orders so flawlessly, it perfectly mimics the high-conversion environments typically associated with an expensive, standalone woocommerce membership plugin. You can use page builders to create highly optimized landing pages, dropping simple shortcodes that lead your traffic directly to the checkout screen of your newly created subscription plans.
Lastly, leverage the detailed reporting. While a generic wp membership plugin might just show you a list of active users, a dedicated e-learning add-on allows you to connect revenue directly to actual educational progress. Monitor which courses inside your subscription tiers have the highest completion rates to understand exactly what your audience values most.
Conclusion: Ready to Launch Your Subscription Site?
Setting up a highly sophisticated, recurring-revenue learning platform does not have to be an overwhelming technical nightmare. By closely following this comprehensive setup guide, your wordpress lms membership site is fully equipped to welcome new subscribers, process complex recurring payments smoothly, and fiercely protect your valuable intellectual property.
From configuring automated billing cycles to building a secure, exclusive lms with membership and file sharing functionality, you now have the exact blueprint required for long-term success. You no longer need to rely on a disjointed woocommerce membership plugin to forcefully bridge the gap between your digital courses and your e-commerce operations.
If you have not upgraded your learning platform yet, right now is the absolute perfect time to make the switch from selling single, isolated courses to building a massive, predictable, and recurring income stream.
Frequently Asked Questions (FAQ)
1. What are the best WordPress LMS and membership plugins?
While the market is flooded with generic tools, the best setup is a native ecosystem. Combining LearnPress (as your core LMS) with its dedicated Memberships & Subscriptions Add-on is highly recommended. It provides a seamless, unified experience without the compatibility glitches often found when forcing third-party membership plugins to work with separate course builders.
2. Should I use an all-in-one LMS or separate plugins?
An all-in-one or native solution is almost always better for e-learning platforms. Using separate, disjointed plugins often leads to database conflicts, broken user access rules, and a clunky checkout experience. A native add-on ensures your curriculum, student enrollments, and recurring payments are perfectly synced under one dashboard.
3. Can I lock courses behind specific membership tiers?
Yes, absolutely! The add-on allows you to easily assign specific courses to different subscription plans using a simple interface. This means you can create a highly accessible "Starter Tier" with basic courses, and a high-ticket "Pro Tier" that unlocks your entire digital academy and premium attachments.