
A spreadsheet of student phone numbers, a shared Google Doc where teachers log attendance, a messenger group where a parent is asking about last Tuesday’s homework: none of these tools talk to each other, and it stops working once there’s more than one teacher, more than a few dozen students, or more than one location. Attendance gets recorded inconsistently, enrollment records drift out of sync when a student switches sections, and materials shared over email have no single place a student can go back to, which is part of why so many teachers end up looking for a dedicated management system once they’re juggling more than one class.
ClassPress is a WordPress plugin built by ThimPress (the team behind LearnPress) that adds offline and blended “class” management on top of a WordPress/LearnPress site, separate from but connected to LearnPress’s own online course structure. If you’ve been running everything through spreadsheets and shared folders, our WordPress classroom management plugin guide covers the broader case for consolidating that into one system.
This article is a hands-on walkthrough of ClassPress class management: how to create class WordPress records, manage student enrollment, build a teaching schedule WordPress calendar, upload class materials, track attendance, and assign homework. Everything below comes from hands-on testing of the live ClassPress demo site (classpressedu.com) as an Admin, a Teacher, and a Student, checked against ClassPress’s official WordPress.org plugin description.
LearnPress – WordPress LMS Plugin
We provide an amazing WordPress LMS plugin to create & sell online courses. Let’s find out!
Try NowWhat is Class Management in ClassPress
At the center of ClassPress class management is a simple idea: a “Class” is its own entity, distinct from a LearnPress “Course.” A class has a name, a status (Draft or Publish), a delivery mode (Online or Offline), an assigned teacher, an enrolled roster, one or more recurring schedules, and its own tabs for Attendance, Materials, and Homework. Creating a class in the ClassPress admin area lands you on a class-detail editor with six tabs: General, Students, Schedules, Attendance, Materials, and Homework.
A second pillar of ClassPress class management is its role structure: there are three separate, role-specific workspaces, one for Admins, one for Teachers, and one for Students. These are different URLs with different sidebars, not the same screen with buttons hidden by role, and visiting an admin URL while logged in as a student returns a plain 404 instead of a redirect.
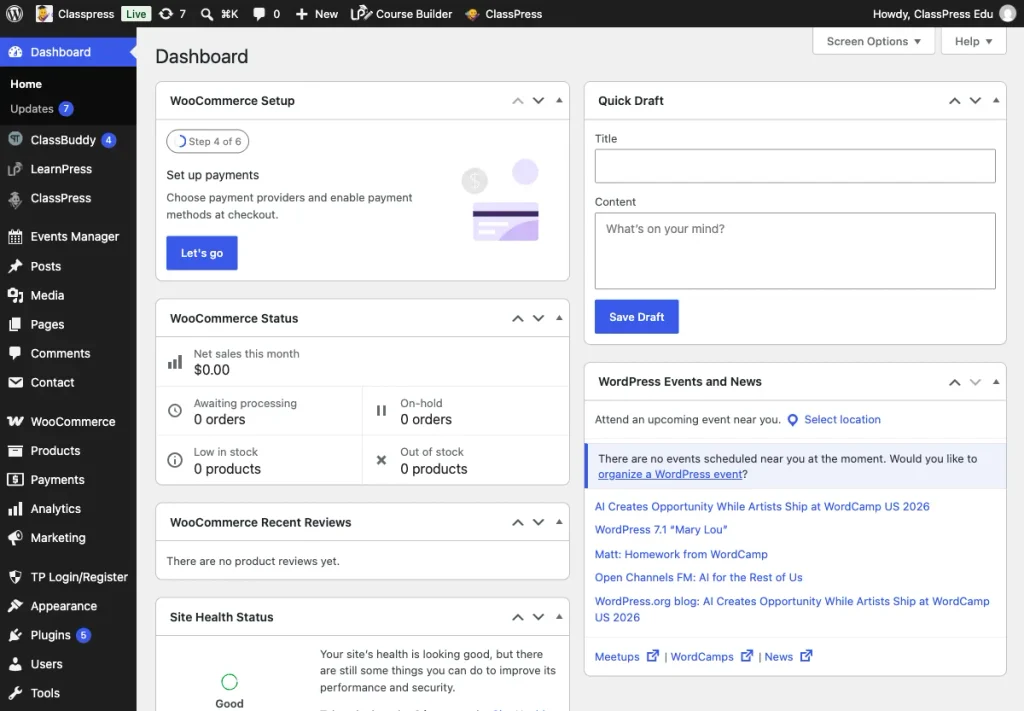
The full ClassPress admin menu, with every module in one place.
How to create class WordPress records
To create class WordPress records, start on the Classes list, the home base for the whole system. On the demo it showed class cards with a cover image, a delivery-mode badge (“Offline” or “Online”), a status badge (“Publish”/”Draft”), a second badge for time-state (“Upcoming”/”Ongoing”/”Complete”), the assigned teacher’s name, a description excerpt, the date range, and student/homework counts. Clicking “Add New Class” opens a small modal with just Class Name, Status, and Description, and creating it immediately drops you into a full six-tab editor.
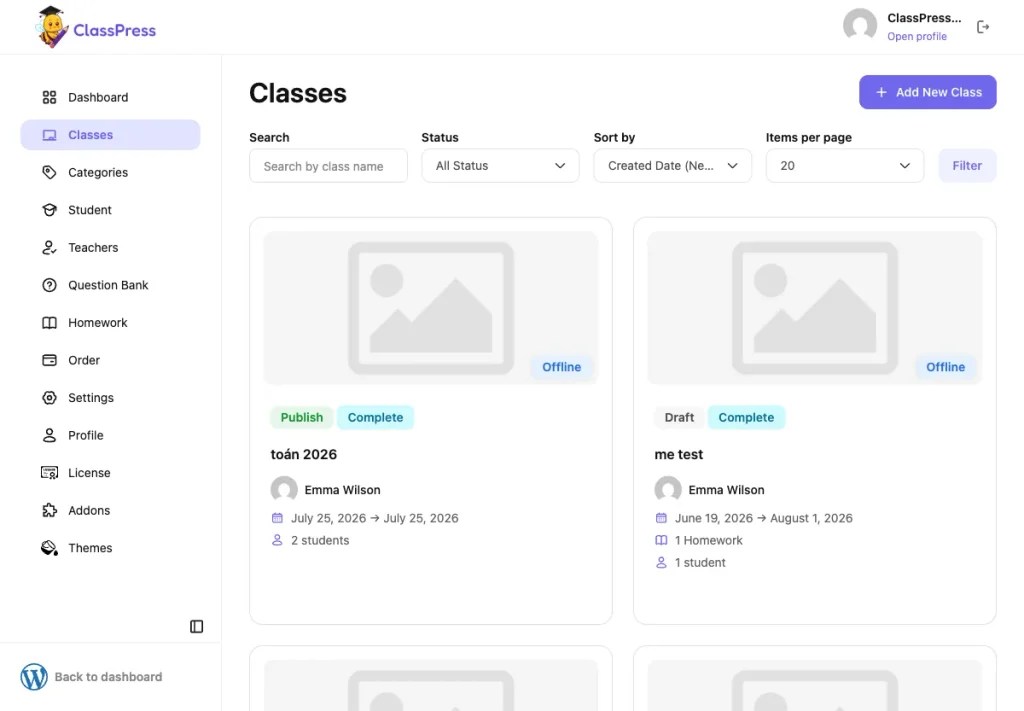
Every class in one list, with status, teacher, and roster size visible without opening it.
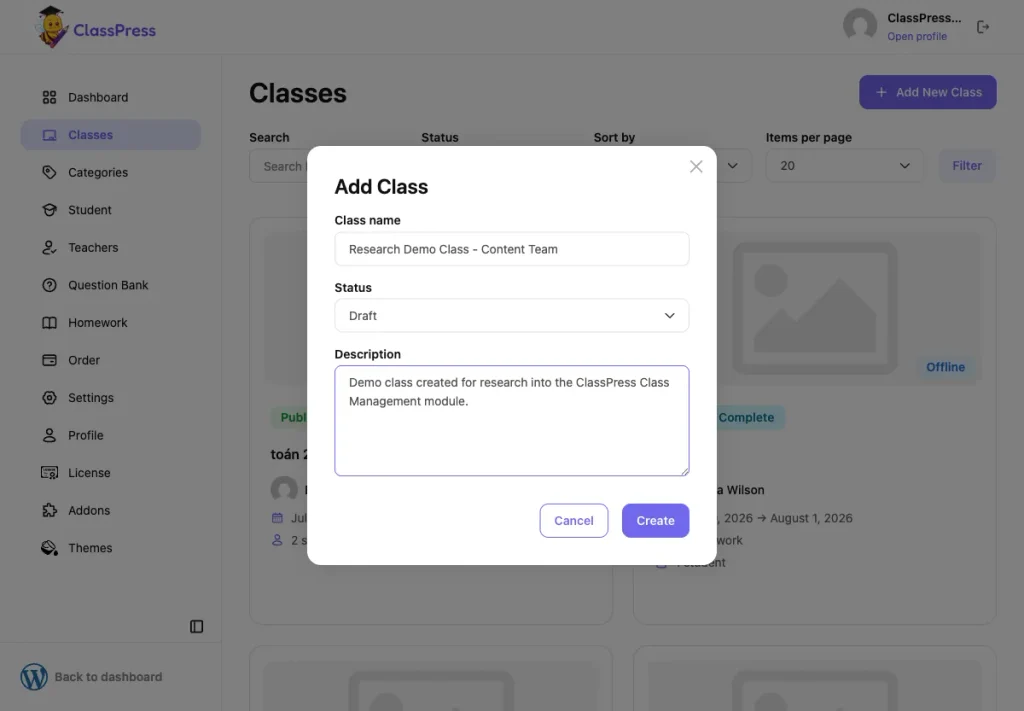
The Add Class modal with a name and description filled in, ready to submit.
Logged in as Admin, filling in the Class name field, leaving Status on the default Draft, and adding a short description was enough to create a real class, which appeared at the top of the Classes list right away and opened its own detail page. From there, the General tab exposed Class Name, a rich text Description editor, a searchable Teacher field, a Price (USD) field, Status, a Featured Image uploader, and a Categories checklist. A “Class Details” summary card on the right shows status, teacher, student count, homework count, and created/modified timestamps, with a “Danger Zone” panel to move the class to trash.
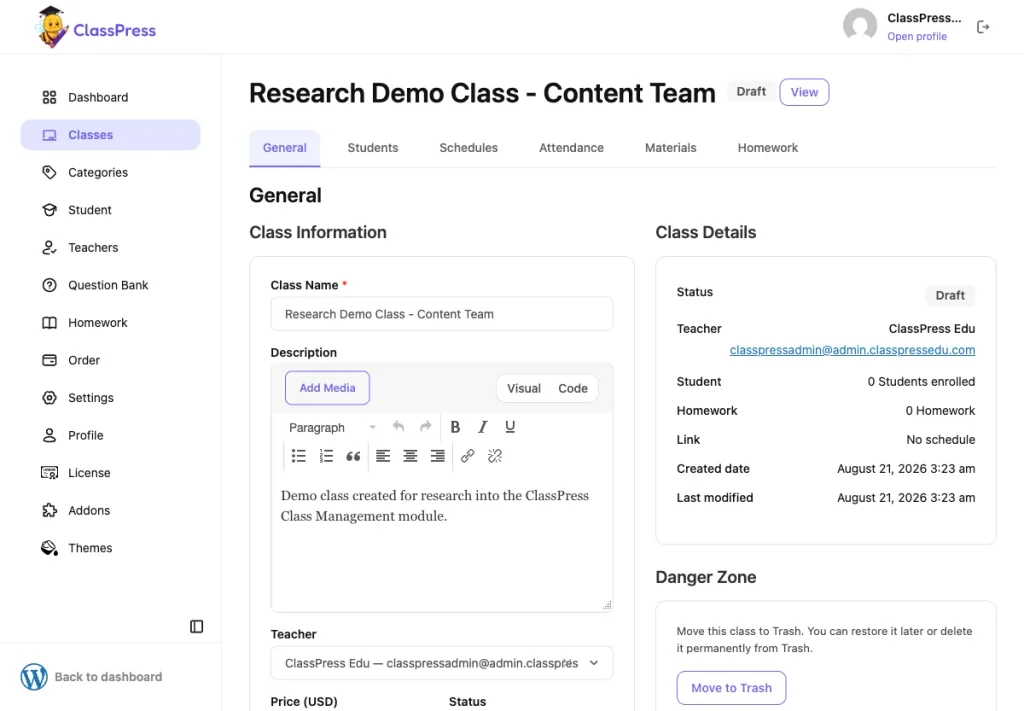
Every class opens into this same six-tab editor: General, Students, Schedules, Attendance, Materials, Homework.
A few things worth knowing about how this part of ClassPress class management, and the create class WordPress flow specifically, actually works:
- The Draft/Publish workflow means a class stays invisible to students until you’re ready to switch it to Publish.
- Both Admin and Teacher can create classes, but only Admin can reassign an existing class to a different teacher or restore one from Trash; a class a teacher creates is automatically owned by that teacher.
- Teachers only ever see classes where they’re the assigned teacher. In the demo, the admin-wide roster had 19 classes; a teacher’s own Classes list never showed more than what belonged to them.
One authoritative record per class beats scattered notes across three documents, and the Draft status means a class can be built out privately and published only once the schedule and roster are actually ready. Once you create class WordPress records this way, the rest of the workflow, enrollment, scheduling, materials, follows from the same class-detail editor.
How to manage student enrollment
To manage student enrollment, use the Students tab of a class, which shows a roster table (Name, Email, Phone, Parent Name, Parent Phone, Class, Status, Created Date, Created By, Actions), with a toolbar for adding a student manually, importing from Excel, or exporting the current roster as CSV. Adding a student opens a dedicated “Add Student to Class” page split into two tabs: Add New and Enroll Existing.
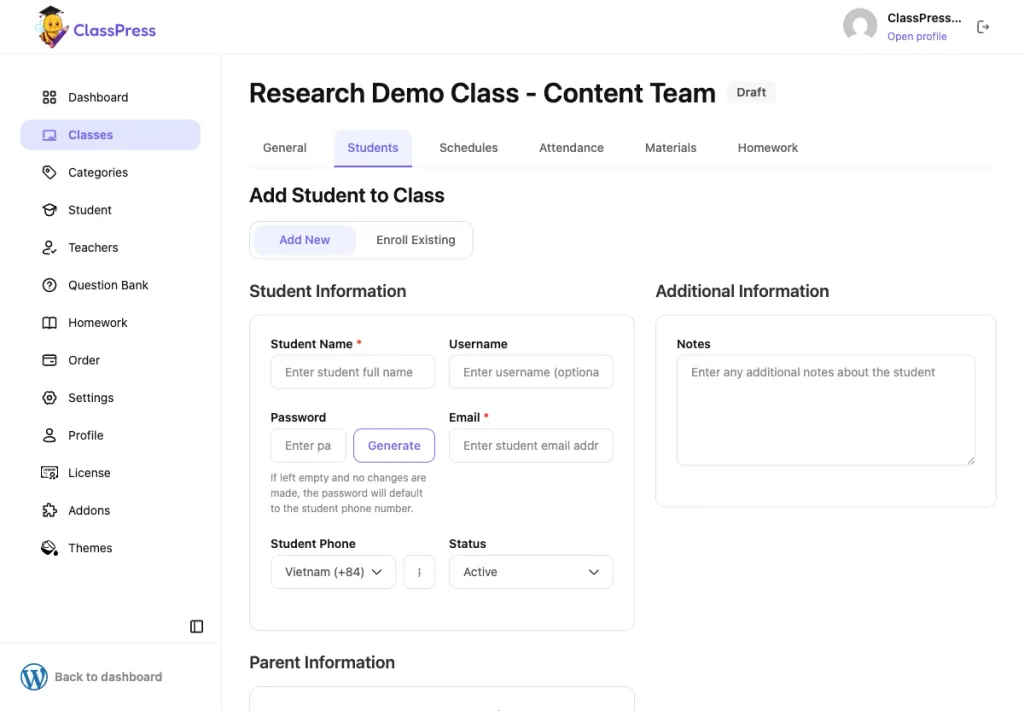
Student name, contact details, and parent contact, all in one form.
On the Add New tab, the form asks for Student Name, Email, Student Phone, a Status toggle, Parent Name, Parent Phone, and a Notes field. Submitting it, tested as both Admin and Teacher, created a brand-new WordPress user account for the student and enrolled them in the class in one step, redirecting back to the Students tab with a confirmation message and an updated roster count.
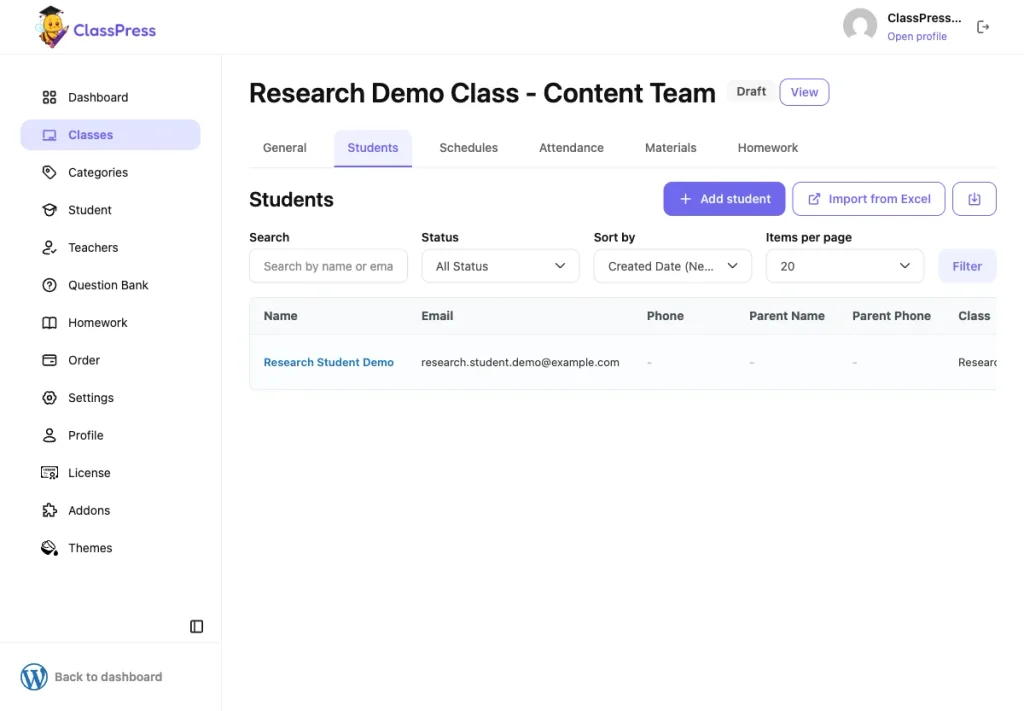
The new student shows up on the roster immediately.
WordPress.org says a user account is “automatically created” when a student is added, and this is literally what’s happening: the Add New form doubles as a WordPress user-account form, so adding a student and giving them a login happen in one step. The Enroll Existing tab shows a searchable table of students already known to ClassPress, each with its own “Enroll” button, for adding someone who’s already a student elsewhere in the system without creating a duplicate account.
The form is identical for both Admin and Teacher roles; there’s no reduced-permission version for teachers. Students can’t enroll themselves through this interface at all. If you’re only going to manage student enrollment and nothing else on this page, this is the tab that matters, and it’s worth bookmarking if you manage student enrollment for more than one class at a time. For what happens after a student’s on the roster, tracking their progress, viewing their profile, importing a batch from a spreadsheet, we’ll go deeper in our upcoming guide to student management in ClassPress.
Setting up a teaching schedule WordPress calendar
A class rarely meets just once, so the teaching schedule WordPress tools live on the Schedules tab, which renders a full month calendar with a legend distinguishing session types by color. Setting up a teaching schedule WordPress calendar correctly here is what makes the rest of attendance tracking accurate later. Clicking “Add Schedule” opens a page with three sections: Basic Information (Schedule Name and two color swatches), Date Range (Start Date, End Date, and an optional Schedule Link field for a meeting URL), and Schedule Details, where you pick days of the week and add a Start Time and End Time for each.
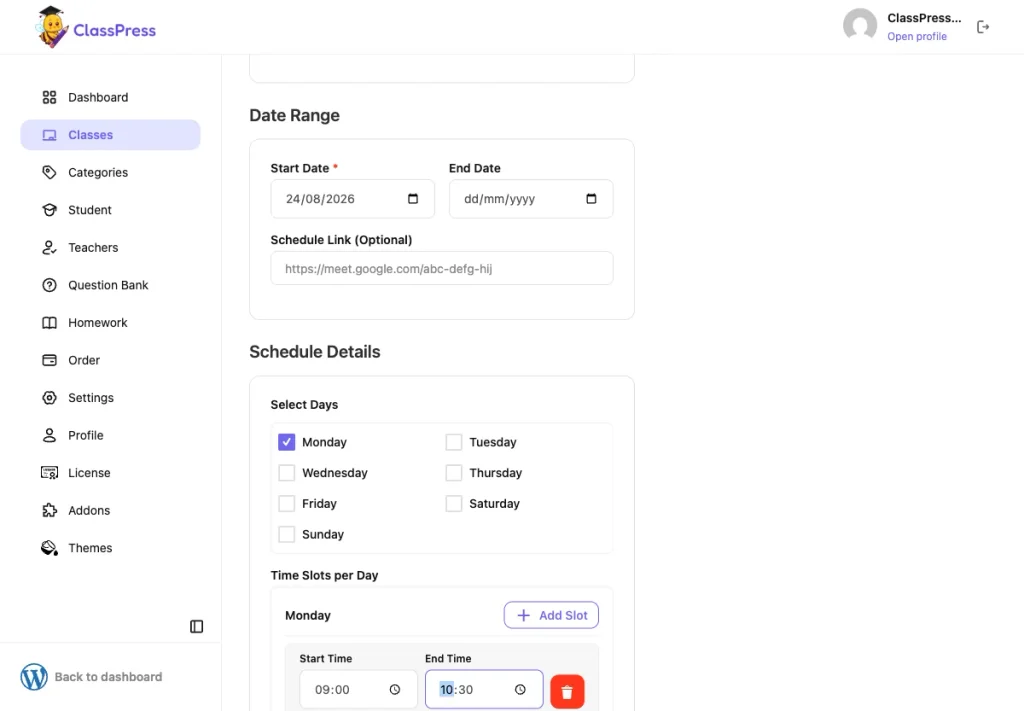
The Add Schedule form filled in with a Monday 9:00–10:30 slot.
Filling in a Start Date, picking Monday as the recurring day, and adding a 09:00–10:30 time slot produced a saved schedule that showed up on the class calendar immediately with its assigned color. On an existing class with months of recurring history, the calendar correctly generated one row per actual session, down to the exact date and time.
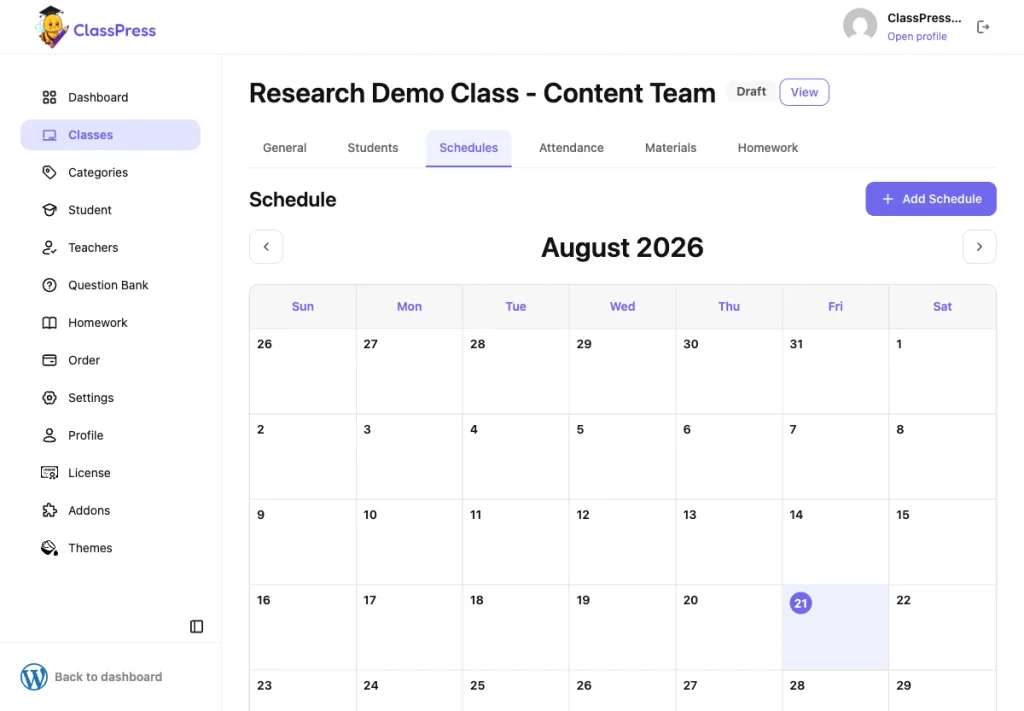
The new schedule shows up on the class calendar right away, in its assigned color.
Per-day time slots handle classes that meet on an irregular pattern without needing multiple entries, and the Schedule Link field means an online class’s join link lives in the same place as its date and time. Students see a read-only version of this same teaching schedule WordPress calendar from their own Schedule page, and a teacher managing several sections gets a single teaching schedule WordPress view for all of them.
Attendance
For a class with an active schedule and enrolled students, the Attendance tab renders a matrix: one row per student, one column per individual session, and a status dropdown in each cell. A “Hide past sessions” toggle keeps things manageable once a class has run for months.
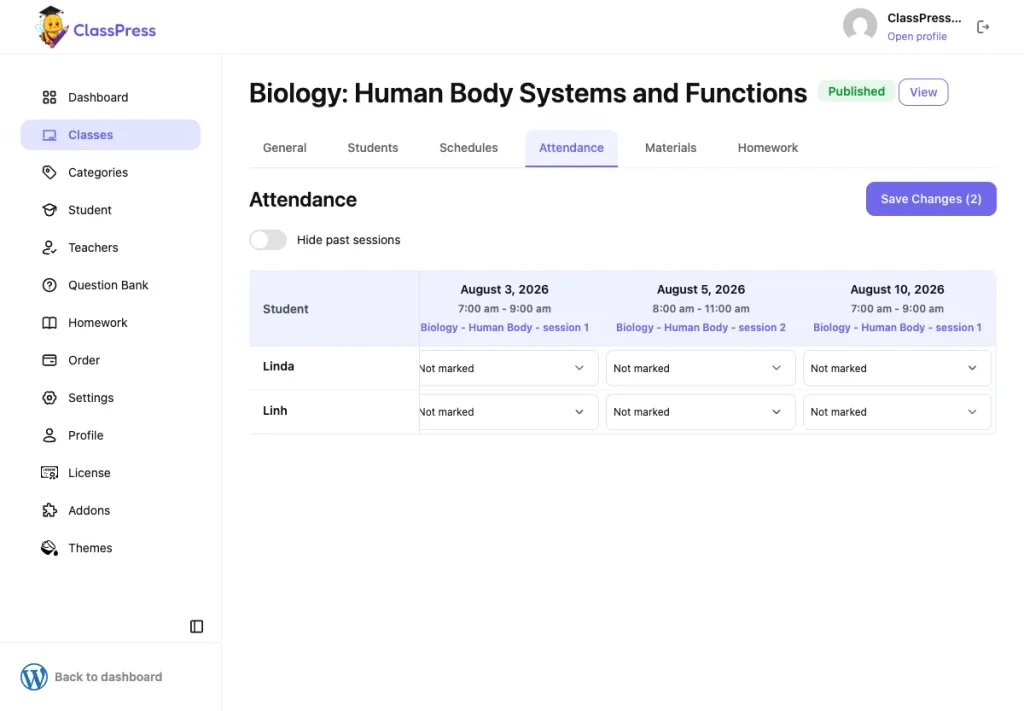
The attendance matrix on an existing class, with months of sessions across the top.
The exact status options, verbatim from the dropdown, are Not marked (default), Present, Absent, Late, and Excused, not the “Present, Excused Absence, Unexcused Absence, and Temporary Leave” framing in ClassPress’s own WordPress.org marketing copy. This tab only appears once you manage student enrollment and set up a schedule for the class first. Selecting a status for a student makes the Save button relabel itself dynamically as “Save Changes (n),” a pending-change counter. Students don’t get an editing interface for any of this; the top-level Student sidebar has no Attendance link at all. We cover the full attendance workflow, including reporting, in a dedicated guide.
How to upload class materials
To upload class materials, the Materials tab on a class offers “Add Material” (file upload) and “Add Link” (external URL) buttons. Every path to upload class materials in ClassPress runs through this one tab, regardless of file type. The upload modal’s helper text states, verbatim: “Support formats: documents (PDF, Word, Excel, PowerPoint, text), images, audio, video and archives. Max size: 2 MB.”
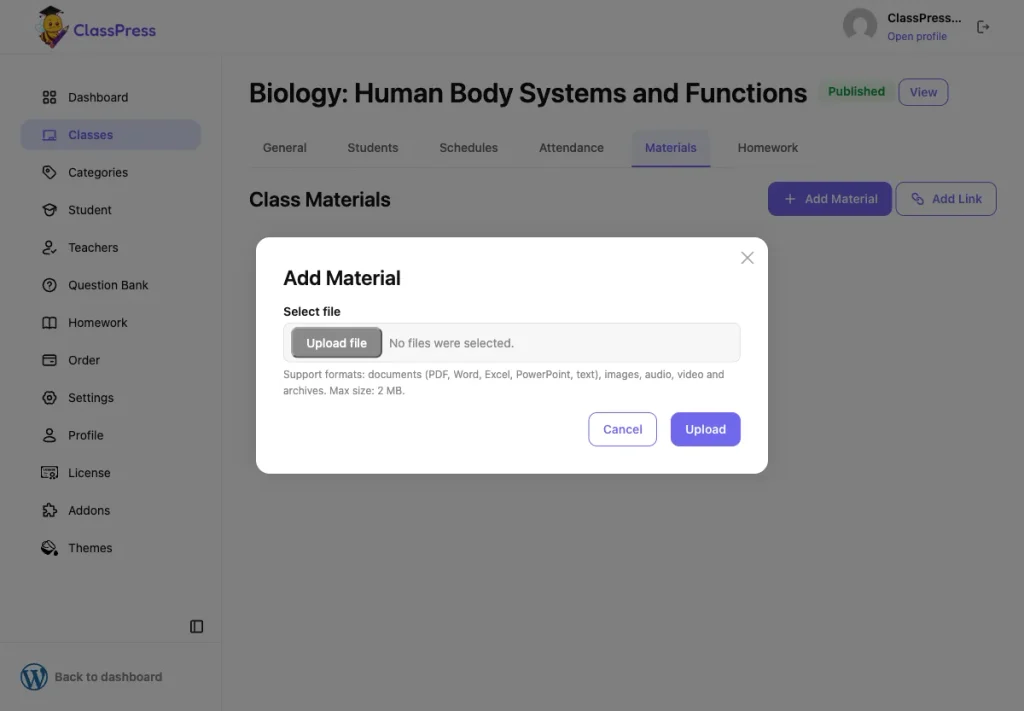
The upload modal’s helper text, documents, images, audio, video, and archives
That cap is worth planning around; a single decent-resolution lecture slide deck can pass 2 MB on its own, so the Add Link button is the more practical route for larger files when you upload class materials for a lecture-heavy class. It’s not confirmed whether the limit is enforced by ClassPress itself or a PHP upload setting on the demo server. Uploading a plain text file through the modal worked cleanly and appeared attached to the class right after, confirming the fastest way to upload class materials is a direct file upload rather than the Add Link route.
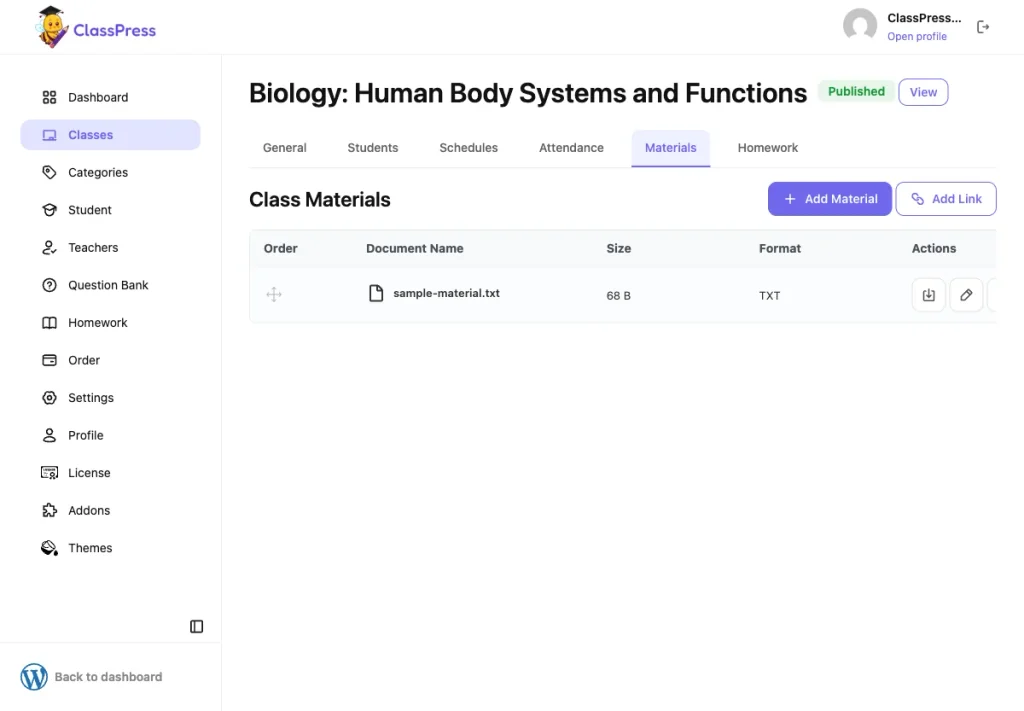
The uploaded file appears on the Materials tab right away, attached to the class.
WordPress.org’s description also claims materials can be organized “for each lesson,” but no lesson-level grouping showed up anywhere in this module; materials appeared scoped to the whole class rather than to individual sessions. It’s the same underlying problem our Chat Room Add-on for LearnPress article touches on: when files live in a channel the LMS doesn’t own, nothing about it is searchable later. Either way, once you upload class materials here, both admin and teacher can find them on the same tab going forward.
Homework
Homework gets created through a two-step wizard: Step 1 — Information and Step 2 — Content. Step 1 covers Homework Title, a Publish toggle, Start and End Date & Time fields, three toggles (“Allow late submissions,” “Allow resubmission,” “Enable file upload”), and an Assignment section where you target either whole Classes or Individual Students through a searchable multi-select.
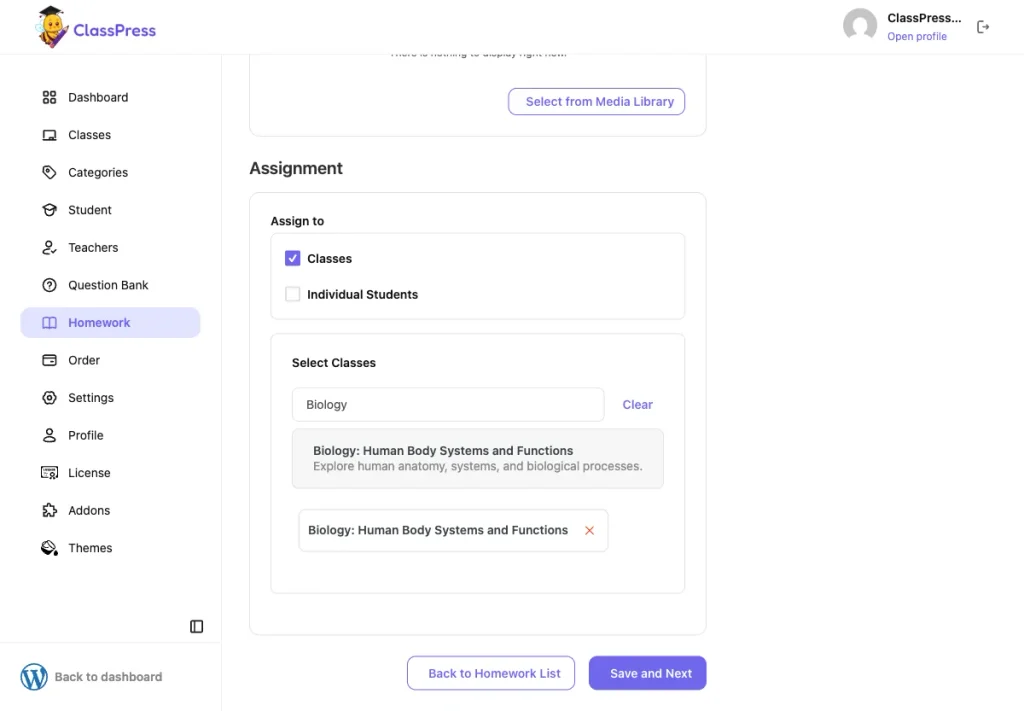
Step 1 of the homework wizard, filled in with a title, date range, and late submissions turned on.
Creating a homework item, setting a start and end date, turning on late submissions and file uploads, and assigning it to a specific class worked end to end and landed on the Content step. From there, “Create Question” opened a modal offering four question types, verbatim: Single Choice, Multiple Choice, True/False, and Essay, not the “multiple-choice and essay” framing used in ClassPress’s own marketing copy.
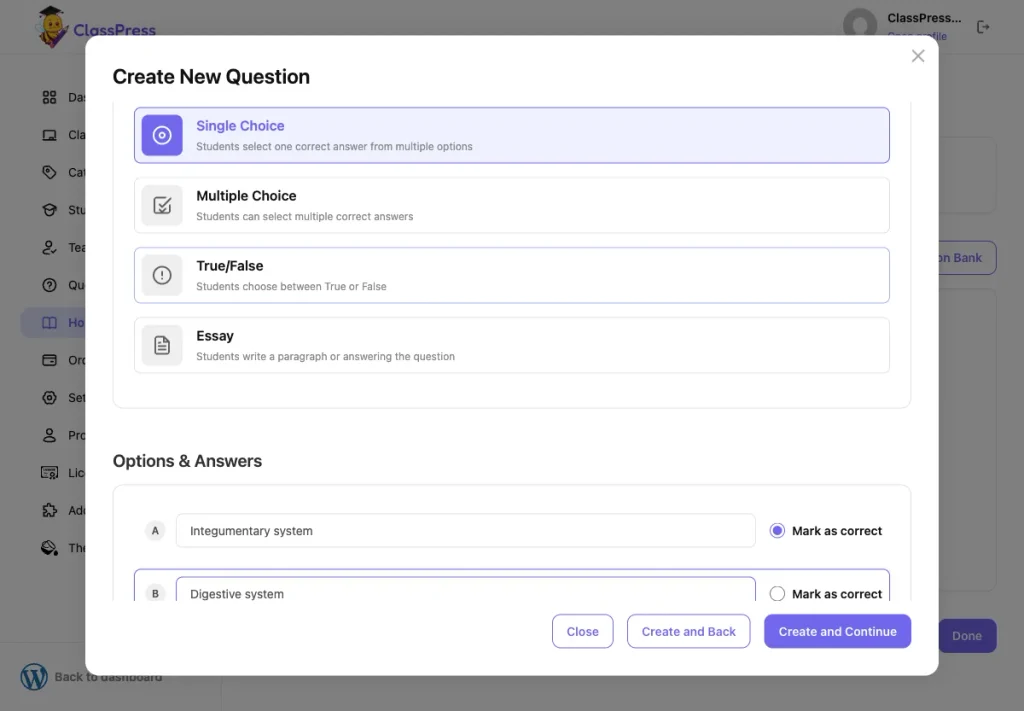
A Single Choice question with two options, one marked correct, ready to attach to the homework.
There’s also a standalone Question Bank separate from any one homework item, so a question can be written once and reused across multiple assignments. Assigning homework to individual students, not just whole classes, covers make-up work without duplicating the homework item. Grading, submissions, and how students actually turn work in are their own topic; we’ll cover that in a dedicated guide to homework and assignments.
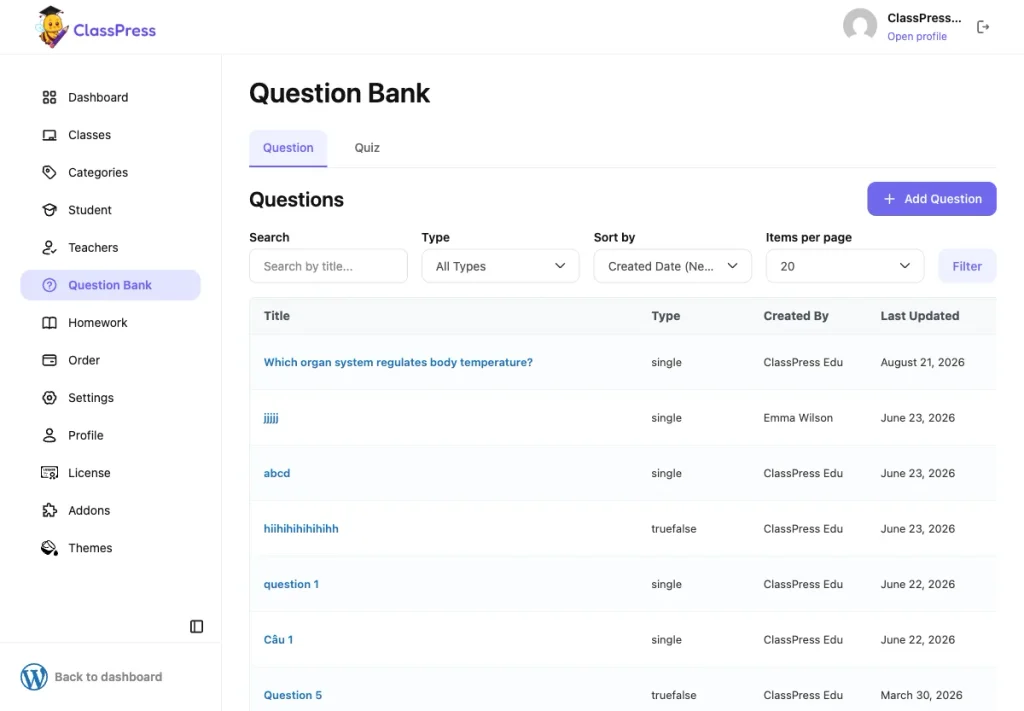
A standalone bank of questions, separate from any single homework item.
Benefits by role
Across all six modules, ClassPress class management permissions follow the same pattern. Admins see everything, site-wide. Teachers get the same tools scoped to just the classes they own, so there’s no need to filter through an entire school’s roster to find what’s theirs. Students get a smaller, read-focused view: Dashboard, All Classes, Schedule, Homework, and Profile, with no access to another student’s data, attendance editing, or the Question Bank. This role scoping is consistent throughout ClassPress class management, and it’s why an admin never has to worry about a teacher seeing another teacher’s roster.
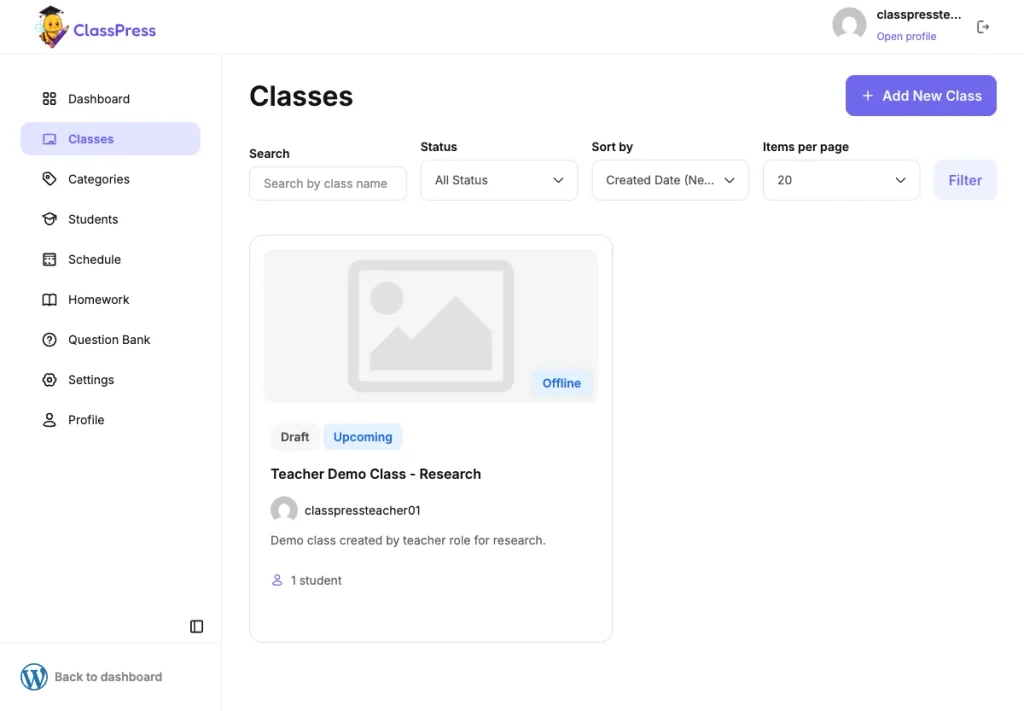
The same Classes list, but scoped to just this teacher’s one class instead of the admin-wide roster of 19.
Each role’s dashboard, and what admins and teachers can actually see in their analytics, is enough of its own topic that it gets a dedicated guide within our broader ClassPress class management coverage.
How to get started
Start on the Classes list in the ClassPress admin (or teacher) workspace and click “Add New Class” to create class WordPress record number one. Give it a name, leave it as Draft, and add a description. Then open the Schedules tab and click “Add Schedule” to set up its teaching schedule WordPress calendar: pick a start date, the recurring day or days, and a time slot for each day the class meets. That teaching schedule WordPress calendar is what everything else, attendance, notifications, the student view, reads from afterward.
On the Students tab, use “Add New” to manage student enrollment for students who aren’t in the system yet, which also creates their login, or “Enroll Existing” for students already elsewhere in the system. Head to the Materials tab to upload class materials, then switch the class Status from Draft to Publish once everything is ready. This is the fastest path to create class WordPress records that are actually ready to run. Once sessions start occurring, mark attendance after each one and create homework when you’re ready to assign it.
Moving that workflow off spreadsheets and into ClassPress class management puts enrollment, scheduling, attendance, materials, and homework in one place, with admins, teachers, and students each seeing a workspace scoped to what they actually need, and it’s the same ClassPress class management setup whether you run one class or fifty. It sits alongside LearnPress, so adding offline or blended classes doesn’t mean adopting a second, disconnected system. If you’re still comparing options before committing to any plugin, our LMS reviews for 2026 roundup is a reasonable place to see how different platforms handle this kind of operational management.
Frequently asked questions
Is ClassPress the same as LearnPress?
No. LearnPress is the core WordPress LMS plugin for online courses. ClassPress is a separate plugin (from the same team) that adds "Class" as its own entity for managing offline or blended classes, covering enrollment, schedules, attendance, materials, and homework, alongside whatever LearnPress courses you're already running.
Can a teacher create their own classes, or does an admin have to do it?
Both can. In the demo, the Teacher role had a working "Add New Class" button on its own Classes list, and a class created by a teacher is automatically owned by that teacher.
Can homework be assigned to just one student instead of the whole class?
Yes. The Assignment step when creating homework lets you choose between targeting whole Classes or Individual Students via a searchable picker.
Can students edit their own attendance or materials?
No. The student workspace is limited to Dashboard, All Classes, Schedule, Homework, and Profile. There's no student-facing editing capability for attendance or materials; those stay under Admin/Teacher control.
Contact US | LearnPress:
Website: https://learnpresslms.com/
Fanpage: https://www.facebook.com/learnpresslms
Email: [email protected]
Read more: LMS reviews 2026: How to pick the right learning management software