
3. Create a PayPal App
Before connecting PayPal to LearnPress Membership, you need to create a PayPal app to obtain the API credentials required for the integration.
Step 1: Access PayPal Developer
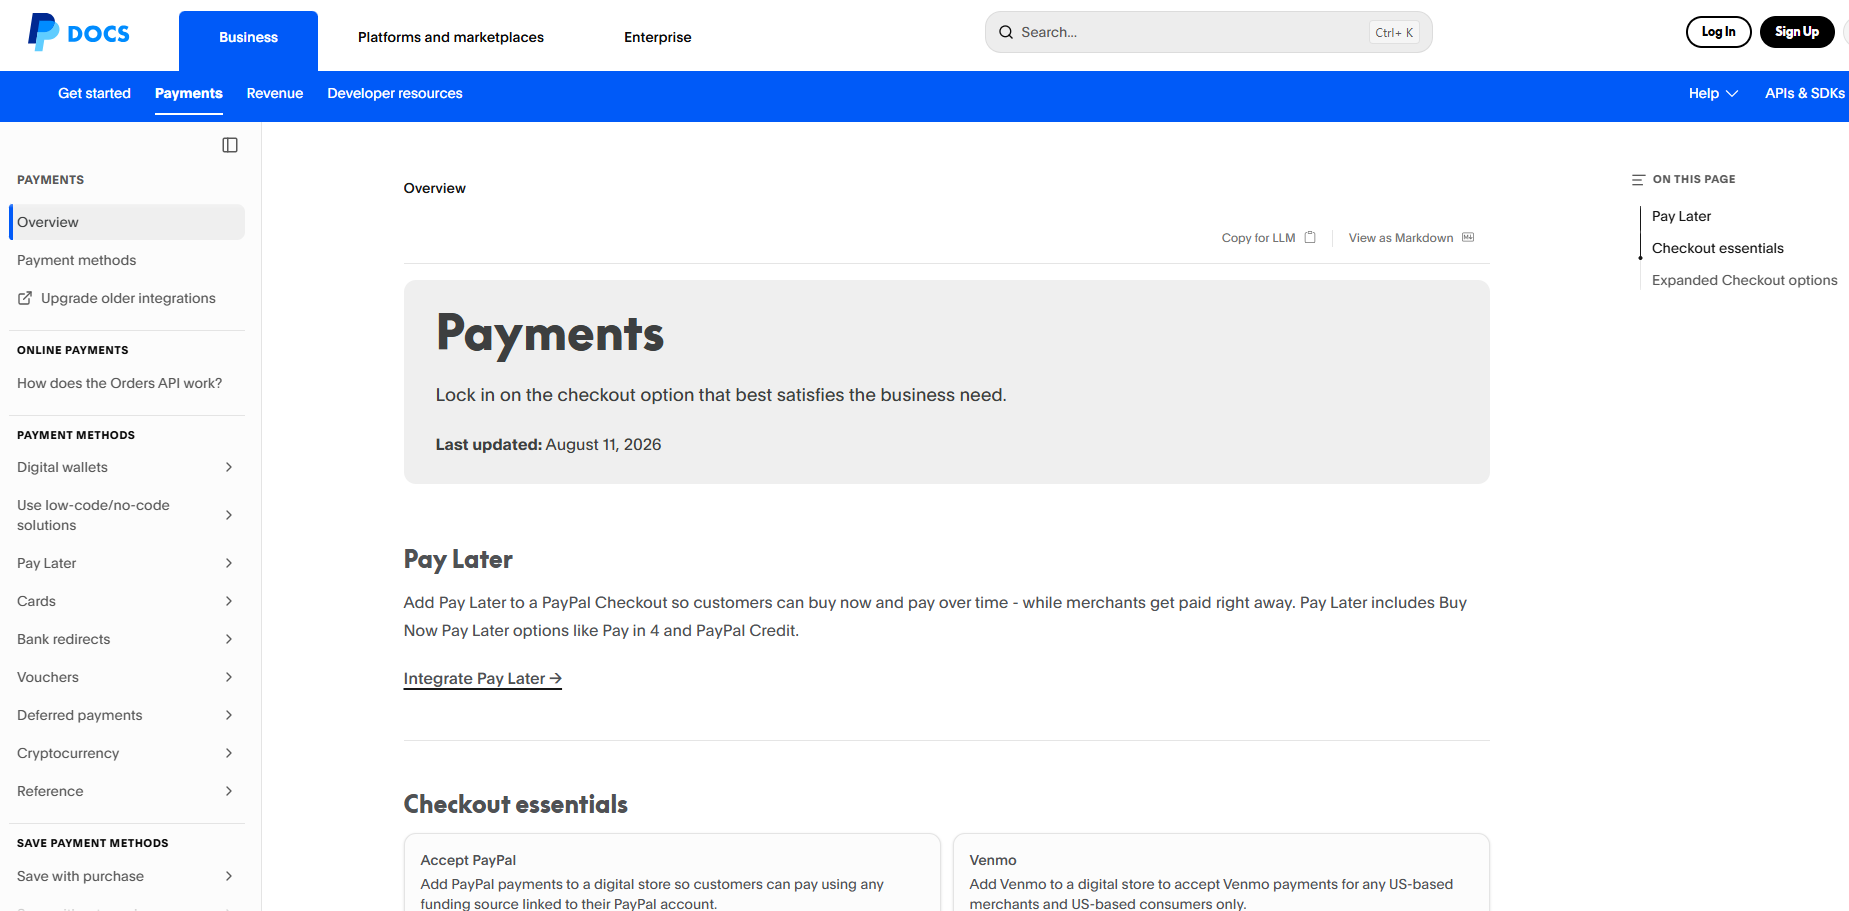
- Make sure you have a PayPal Business account. If you don’t have one yet, visit PayPal to sign up for a Business account before proceeding.
- Visit PayPal Developer and sign in.
- Go to Apps & Credentials
Step 2: Create a Sandbox App
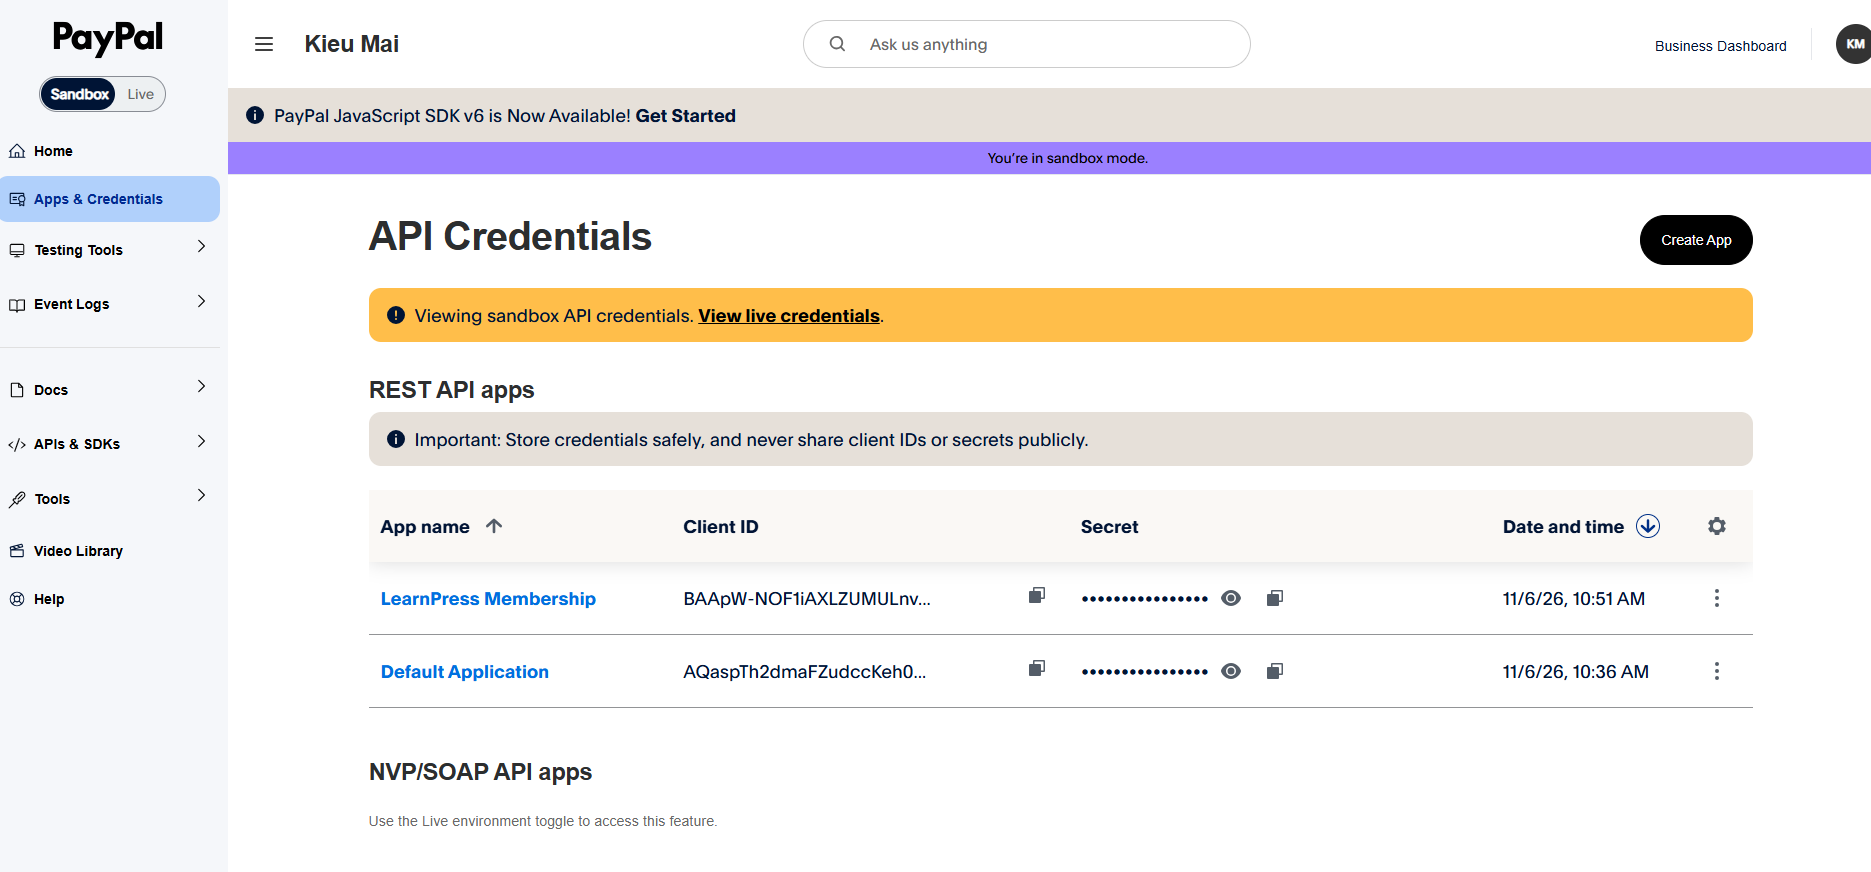
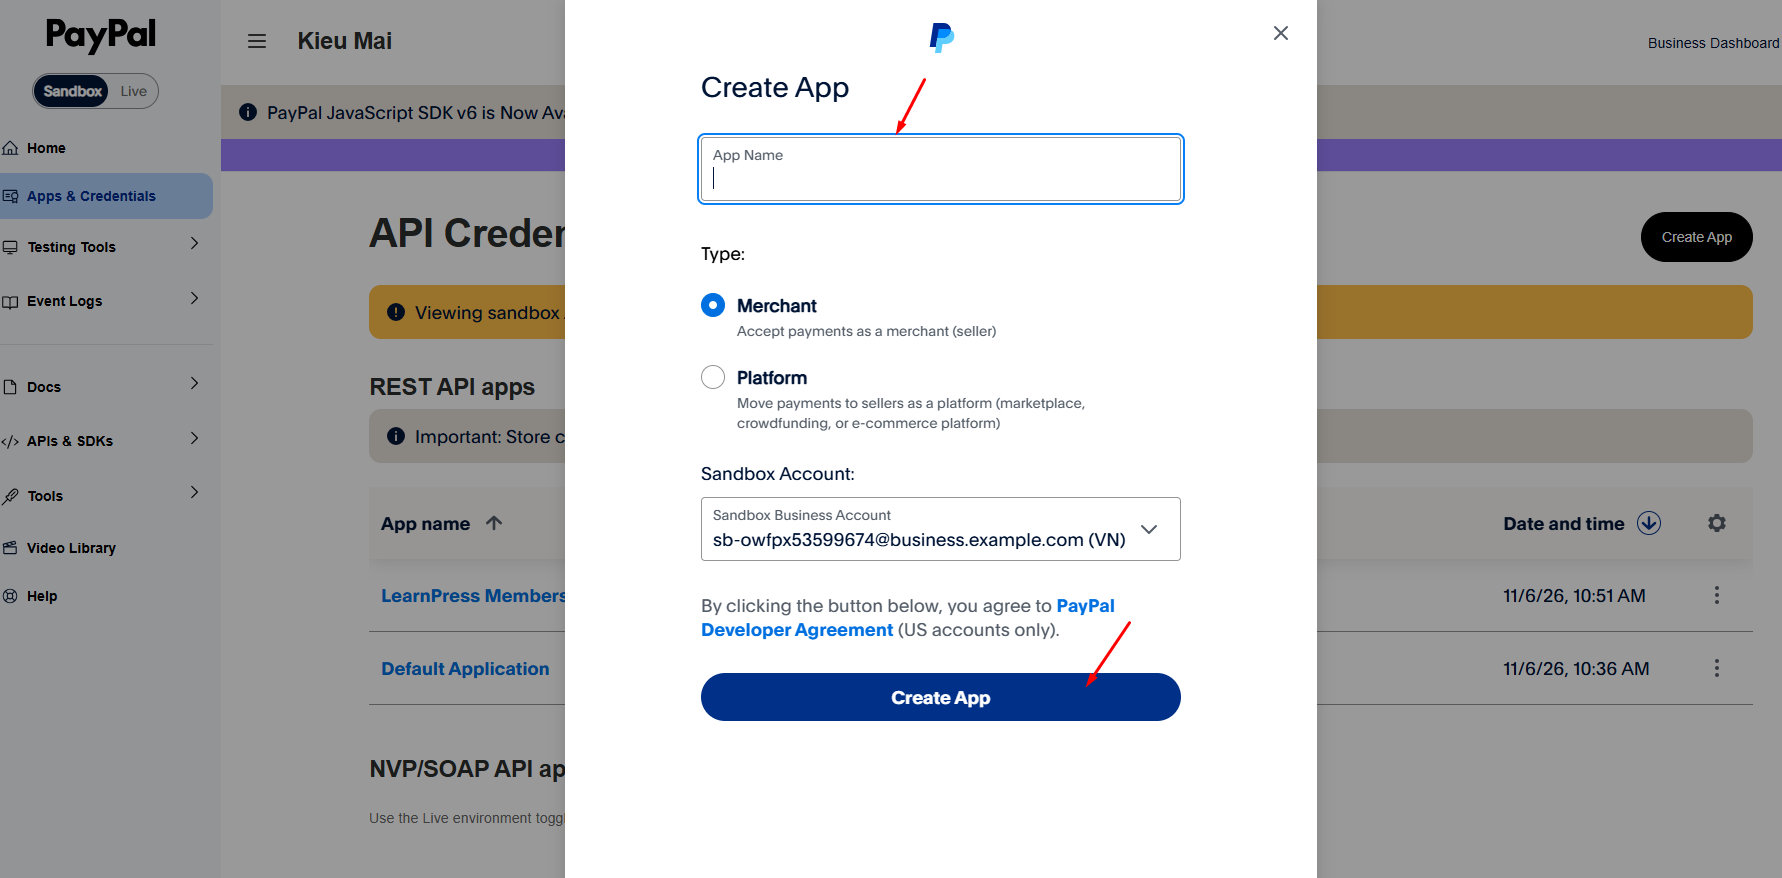
- Select the Sandbox tab to create an app for testing.
- Click Create App.
- Enter an app name, such as
LearnPress Membership. - Select Merchant as the app type and choose your Sandbox Business account.
- Click Create to finish creating the app.
Step 3: Get Your API Credentials
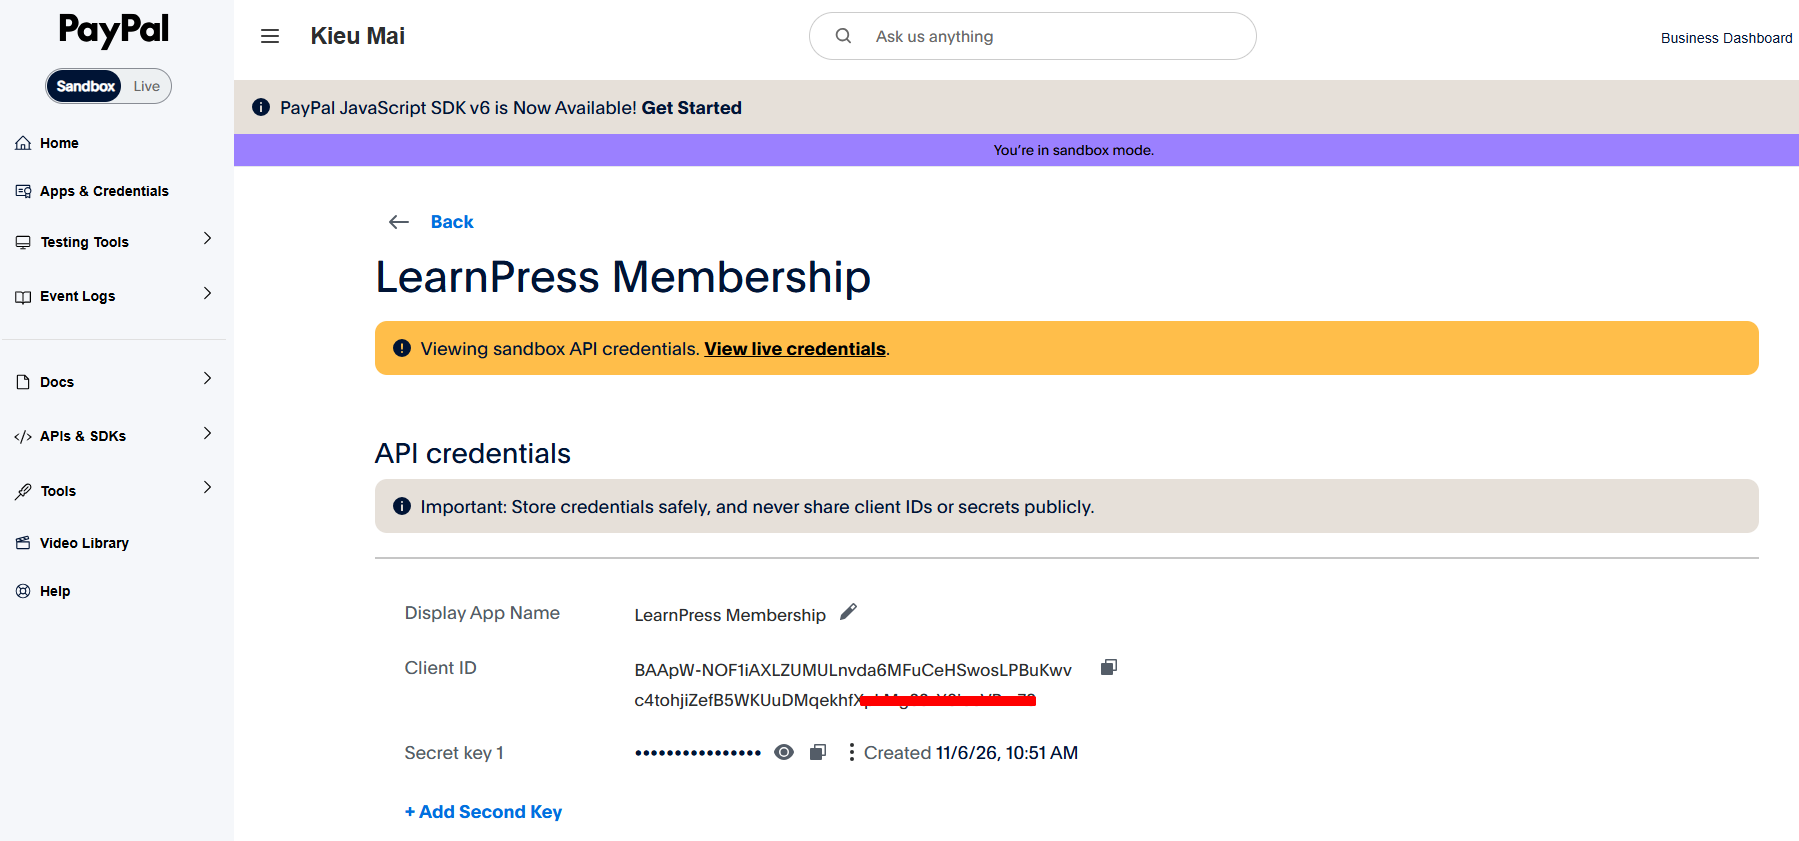
After creating the app, open its details page. You will find two important credentials:
- Client ID: Copy this value. You will need it to connect LearnPress to PayPal.
- Secret: Click Show to reveal the value, then copy it. This key is used for secure communication between LearnPress and PayPal.
Keep your Secret private and never share it publicly.
Step 4: Enable Subscription Support
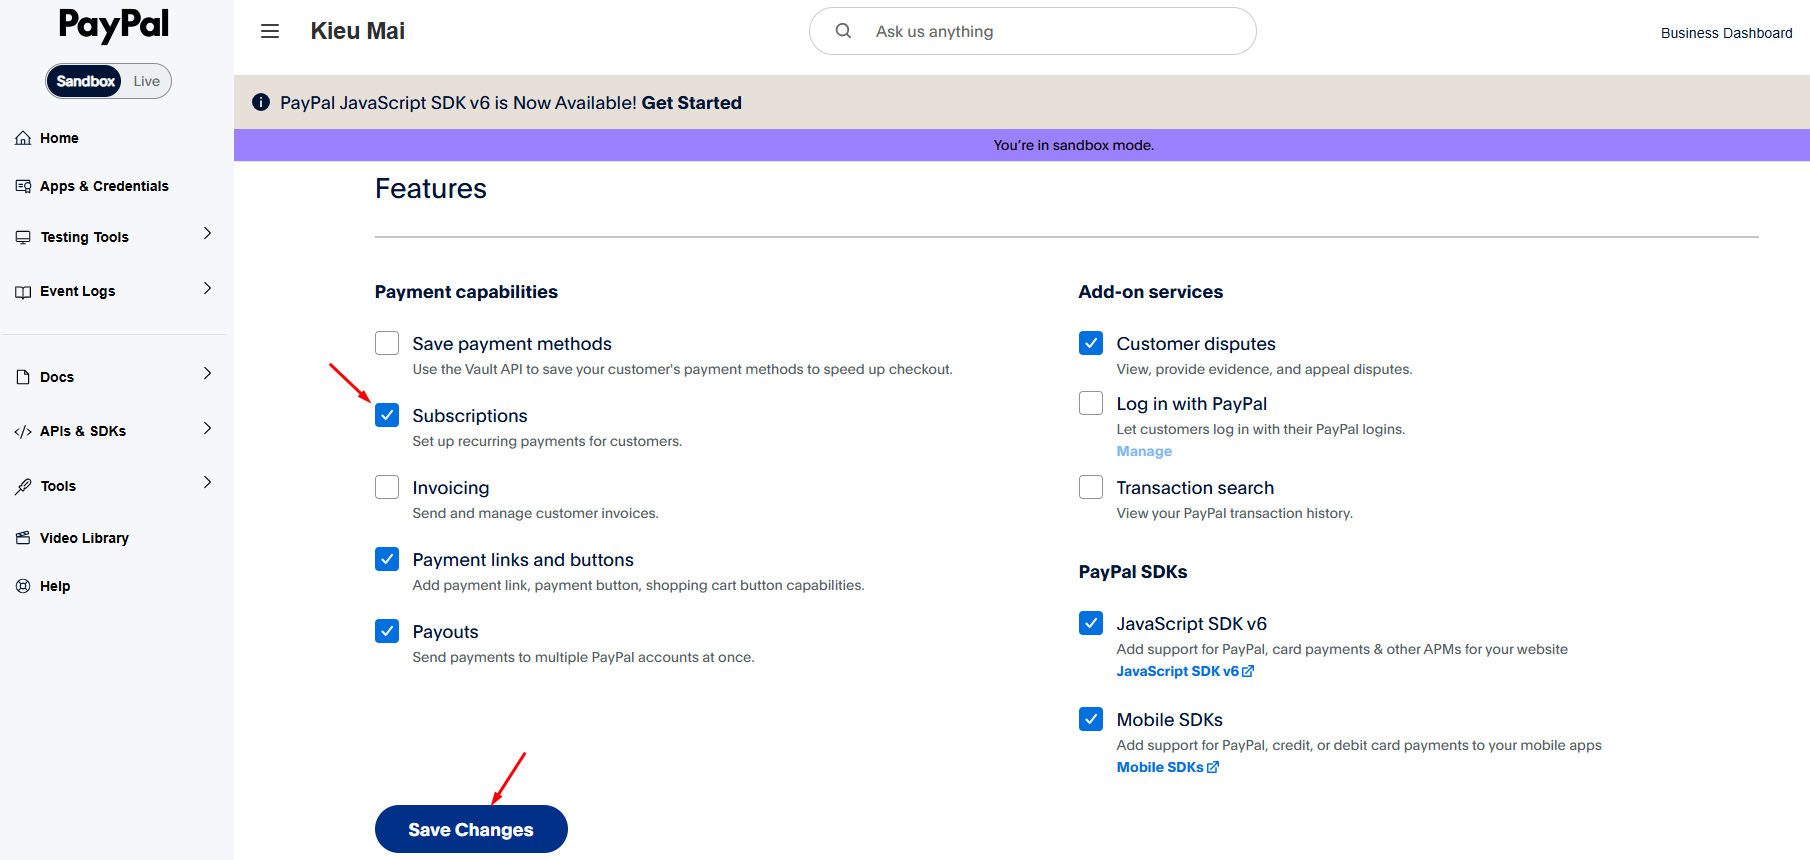
Under the Features section, check whether Subscriptions is enabled. If this option is available, make sure it is turned on.
This feature is required for creating and managing recurring subscription plans through PayPal.
Note: The Sandbox app and Live app have separate credentials. You must create a separate app for Live payments when you are ready to accept real transactions.
3.1. Set Up PayPal Webhooks
Webhooks allow PayPal to notify your website when a subscription is created, activated, cancelled, or when a payment is completed or fails.
LearnPress uses these notifications to keep Membership subscription statuses up to date.
Step 1: Get Your Webhook URL
Go to LearnPress → Settings → Payments → PayPal and locate the Webhook URL displayed under the subscription settings.
The URL follows this format, You can copy your domain name from there and enter it in PayPal.
https://YOUR-DOMAIN.com/wp-json/lp/v1/gateways/paypal/subscription-webhook
Step 2: Add a Webhook in PayPal
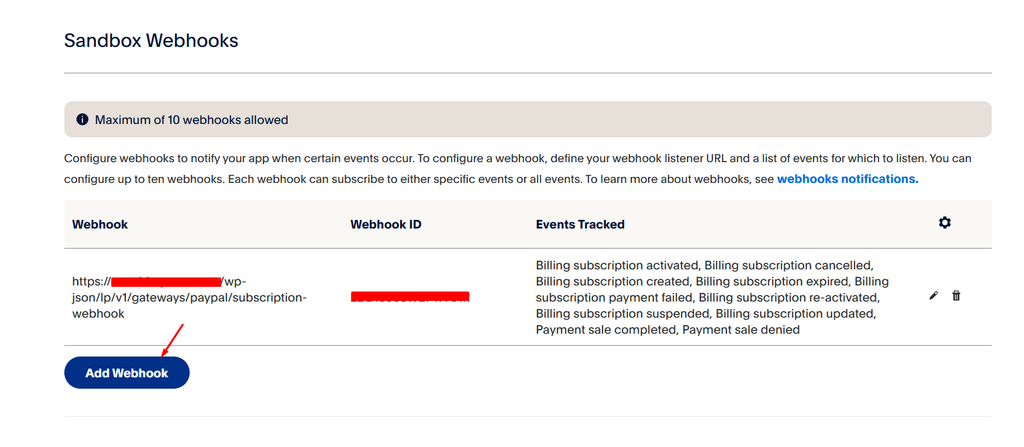
- Return to your PayPal app details page.
- Scroll down to the Webhooks section.
- Click Add Webhook.
- Paste your website’s Webhook URL into the Webhook URL field.
Step 3: Select Webhook Events
Select the following events so PayPal can notify LearnPress about subscription activities:
BILLING.SUBSCRIPTION.CREATEDBILLING.SUBSCRIPTION.ACTIVATEDBILLING.SUBSCRIPTION.CANCELLEDBILLING.SUBSCRIPTION.SUSPENDEDBILLING.SUBSCRIPTION.EXPIREDBILLING.SUBSCRIPTION.PAYMENT.FAILEDPAYMENT.SALE.COMPLETED
Click Save to create the webhook.
Step 4: Copy Your Webhook ID
After saving, PayPal will display the newly created webhook in the Webhooks list.
Copy its Webhook ID. You will need this ID when configuring PayPal in LearnPress.
Important: Testing Webhooks on a Local Website
PayPal cannot send webhook notifications directly to localhost.
If your website is running locally, you need to expose it through a publicly accessible HTTPS URL using a tool such as ngrok, Cloudflare Tunnel, or Local Live Link.
Use the generated public URL when configuring your webhook.
3.2. Configure PayPal in LearnPress
Once you have your PayPal API credentials and Webhook ID, you can connect PayPal to LearnPress.
Step 1: Enable PayPal
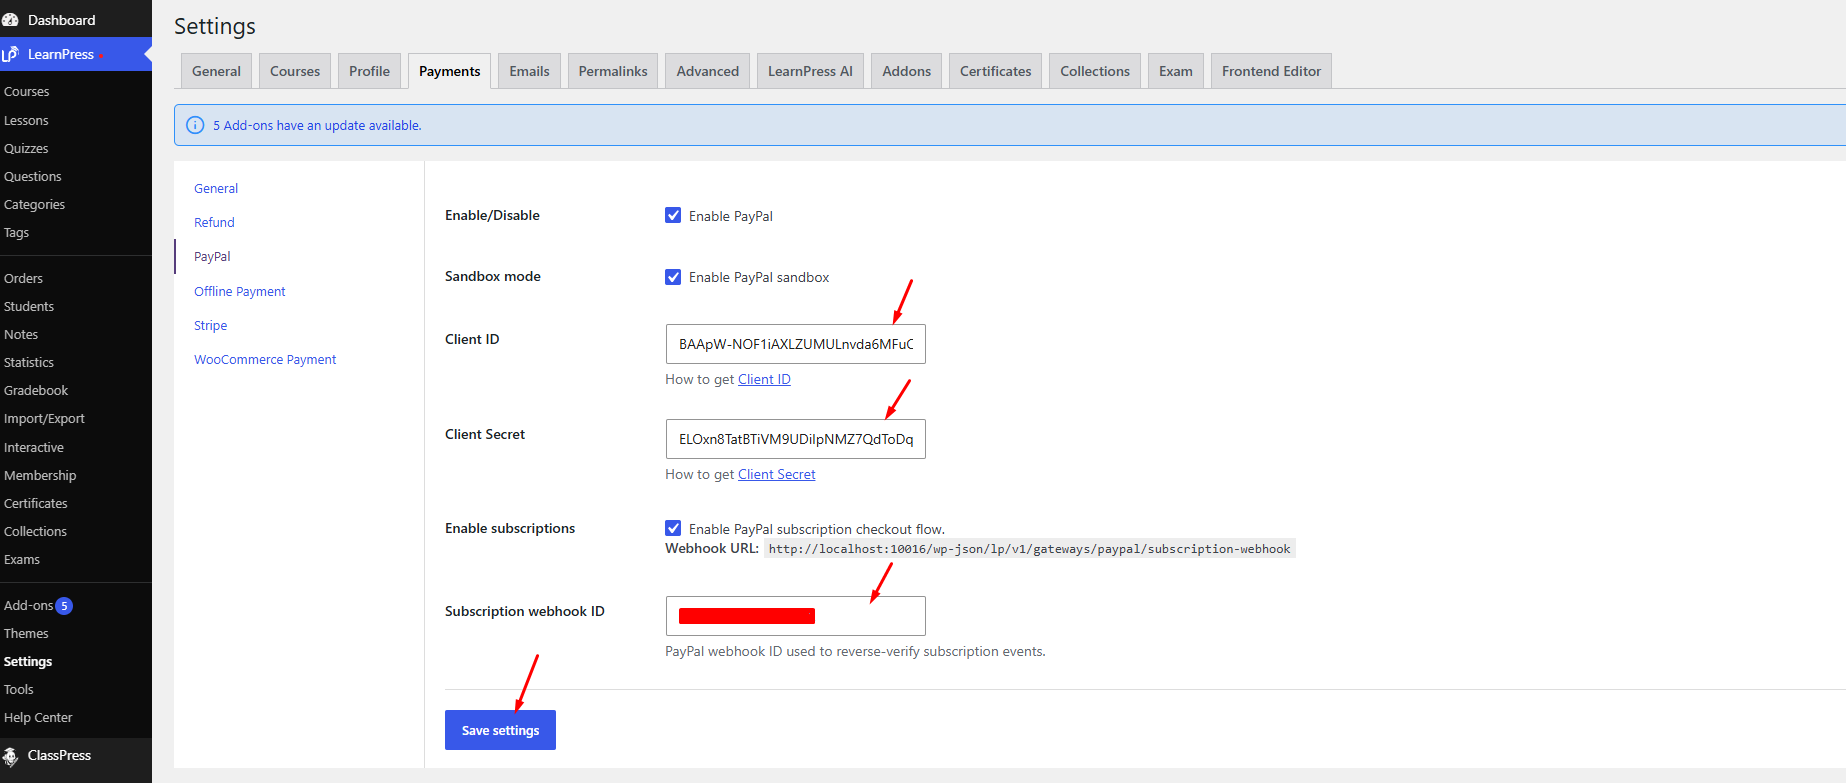
Navigate to LearnPress → Settings → Payments → PayPal.
Configure the following options:
| Setting | Description |
|---|---|
| Enable/Disable | Enable PayPal as a payment method. |
| Sandbox mode | Enable this option when testing with Sandbox credentials. Disable it when using Live credentials. |
| Client ID | Enter the Client ID |
| Client Secret | Enter the Secret |
| Enable subscriptions | Enable this option to allow students to purchase Membership plans through PayPal subscriptions. |
| Subscription webhook ID | Enter the Webhook ID |
Step 2: Save Your Settings
After entering all the required information, click Save settings.
Your PayPal integration is now configured. You can proceed to connect PayPal to your Membership plans.
Step 3: Enable PayPal for a Membership Plan
- Go to Membership → Add New Plan or edit an existing Membership plan.
- Locate the Gateway References section.
- Find the PayPal payment gateway and enable Offer this gateway at checkout.
You can connect a PayPal plan in two ways:
Automatic Mode
If you do not have an existing PayPal Plan ID, leave the integration in automatic mode.
When you save the Membership plan, LearnPress will automatically create the corresponding Product and Billing Plan in PayPal. The generated Plan ID starts with P-.
Manual Mode
If you already have a PayPal Plan ID:
- Click Enter manual ID.
- Enter your existing PayPal Plan ID.
- Click Verify Plan to validate the ID.
You can also enable Stripe if you want to offer both payment methods. Students will be able to choose their preferred payment gateway during checkout.
3.3. Test a PayPal Subscription Payment
After completing the configuration, you should test the subscription checkout process to make sure PayPal and LearnPress are communicating correctly.
Step 1: Proceed to Checkout
- Open your website as a student.
- Select a Membership plan that supports PayPal.
- Proceed to checkout and select PayPal as the payment method.
PayPal will redirect you to its Sandbox checkout page, where you can review the subscription details.
Step 2: Sign in with a Sandbox Personal Account
When PayPal asks you to sign in, use a Sandbox Personal account.
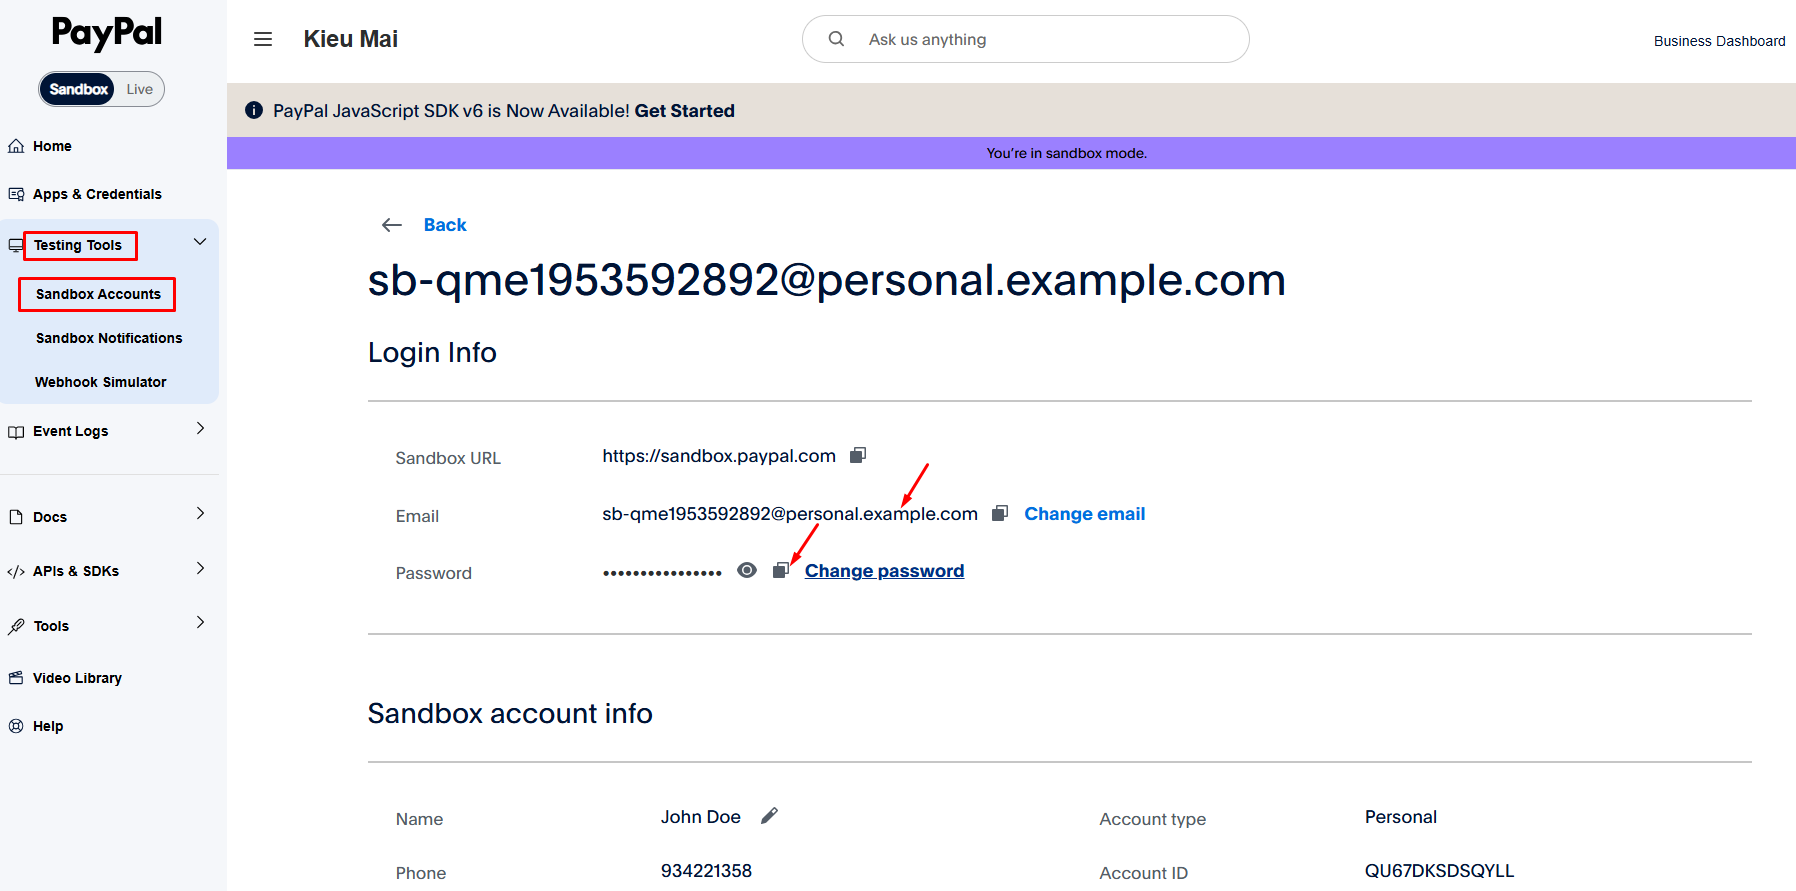
To find your test account:
- Go to PayPal Developer.
- Navigate to Testing Tools → Sandbox Accounts.
- Select a Personal account and use its login credentials.
Do not use your real PayPal account when testing.
Step 3: Approve the Subscription
Review the subscription details, including the plan name, price, and billing cycle.
Click Agree & Subscribe to approve the subscription.
After successful approval, PayPal will send the relevant webhook notifications to your website. LearnPress will process these notifications and update the subscription status accordingly.
3.4. Switch from Sandbox to Live Mode
Once you have successfully tested the integration, you can switch to Live mode to accept real payments.
Follow these steps:
- Go to PayPal Developer → Apps & Credentials.
- Select the Live tab and create a new Live app.
- Copy the Live Client ID and Secret.
- Create a new Live webhook using your website’s Webhook URL.
- Copy the new Live Webhook ID.
- Return to LearnPress → Settings → Payments → PayPal.
- Replace your Sandbox credentials with the Live credentials.
- Update the Subscription webhook ID with the Live Webhook ID.
- Disable Sandbox mode and save your settings.
- Make sure your Membership plans have valid Live PayPal Plan IDs before accepting real payments.
Important: Sandbox and Live environments use separate API credentials, webhooks, and subscription plans. Make sure you use the correct information for each environment.