If you run courses on LearnPress and want proof that students actually learned something instead of just clicking through to the end, this guide on how to set up the Exam Add-on for LearnPress walks you through the entire process, from installation to your first graded result. You will see how to build a question bank, configure timing and attempts, and read the analytics once candidates start submitting answers.
LearnPress itself is the WordPress LMS plugin behind more than 100,000 active installs, and the Exam Add-on extends it with a standalone testing layer built for certification and assessment rather than in-course quizzes.
LearnPress – WordPress LMS Plugin
We provide an amazing WordPress LMS plugin to create & sell online courses. Let’s find out!
Try NowTable of Contents
What is the Exam add-on for LearnPress
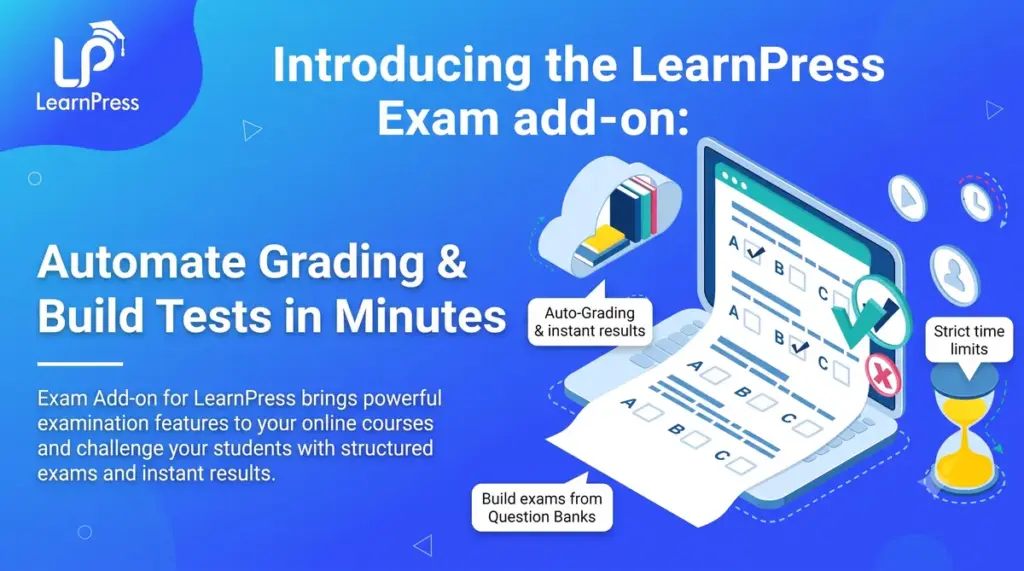
The Exam Add-on for LearnPress is a plugin that lets you build standalone, gradable exams that sit independently of any single course. Instead of a quiz tucked inside a lesson, you get a dedicated exam type that can pull questions from multiple courses and act as a final, credential-worthy assessment.
The add-on supports both automatic and manual grading, timed sections, attempt limits, anonymous access for candidates who don’t have an account, and detailed performance analytics. In practice, that means you can run everything from a short placement test to a formal certification exam without leaving your WordPress dashboard.
As of this writing, the add-on is on version 1.0.0, last updated 07 July 2026, and lists compatibility with WordPress version 7.0. Since this is a first release, expect the changelog to grow quickly, so check the version number against your own site before activating it on a production LMS.
Exam vs. quiz: why the distinction matters
A LearnPress quiz lives inside a course and checks understanding as a student progresses through lessons. It’s a step, not a destination.
An exam is different. It stands on its own as a content type, independent of any one course, and it can draw knowledge from several courses at once. That matters if you’re issuing certificates or trying to prove mastery rather than just tracking completion. Course completion tells a student they finished; an exam tells them, and anyone reviewing their result, that they actually know the material. That distinction is part of what separates a paid credential from a free video that covers the same topic.
Before you begin: requirements and compatibility
Before you install anything, confirm the basics:
- LearnPress core plugin: The Exam Add-on extends LearnPress, so the core LMS plugin needs to be active first.
- WordPress version: The listed compatibility is WordPress 7.0. If you’re running an older version, update WordPress before activating the add-on.
- A ThimPress account: You’ll need this to download the plugin file and register your license key after purchase.
- A staging environment (recommended): Since this is a version 1.0.0 first release, test it on staging before rolling it out to a live course catalog.
How to set up the Exam add-on for LearnPress
Once the prerequisites are in place, setup breaks down into six practical steps.
Step 1: Purchase and install the add-on
The Exam Add-on is available as a lifetime license for one site, which includes 12 months of update and support. At the time of writing it’s priced at $19, discounted from $39, and there’s a 25% off coupon (LPAUG2026) that applies to selected add-ons. If you want coverage beyond the first year, you can add it at checkout: one extra year of updates costs $13, two years costs $25, and three years costs $34.
After purchase, download the plugin ZIP from your ThimPress account, then go to Plugins > Add New > Upload Plugin in your WordPress dashboard, upload the file, and activate it. Enter your license key under the LearnPress settings so the plugin can receive updates.
Step 2: Build your question bank
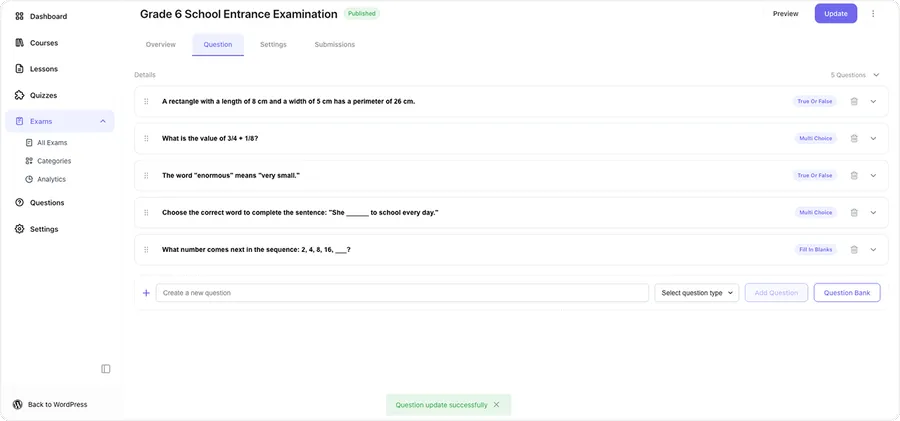
The exam pulls from your existing LearnPress question bank, so there’s no need to rebuild questions for every new test. The add-on supports single choice, multiple choice, true/false, and fill-in-the-blank formats. Organize questions by category as you add them; that categorization is what lets you assemble a new exam in minutes instead of starting from a blank sheet each time.
Step 3: Create your first exam
From the exam builder, drag, drop, and reorder questions to control exactly how the exam flows. Because exams are independent of any single course, you can mix questions from different courses into one assessment if your certification needs to test knowledge across topics.
Step 4: Configure timing, attempts, and access rules
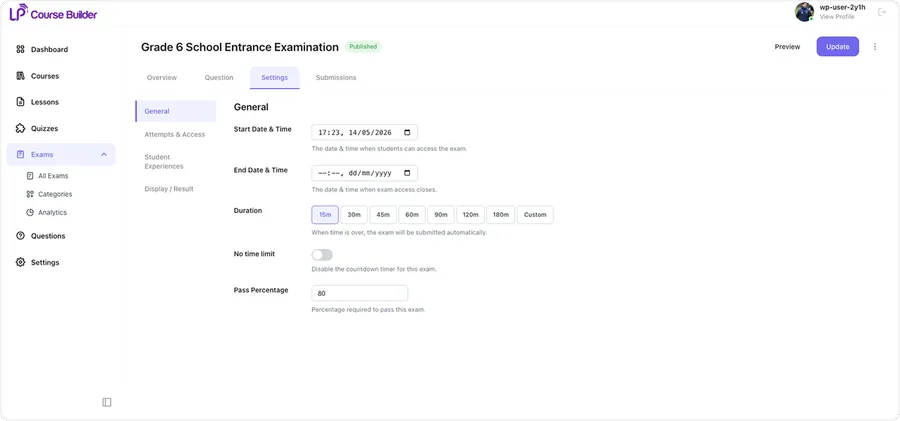
This is where the “total control” part of the add-on shows up. You can:
- Set start and end dates, plus an overall duration, so the exam opens and closes exactly when you intend.
- Set time limits at the exam, section, or individual question level.
- Limit how many attempts a candidate gets, and set a completion window after enrollment.
- Randomize question order, and require a passing score before a candidate can move forward.
- Turn on anonymous access, which lets people take the exam without creating a course account, useful for placement tests, open certification, or lead generation.
Step 5: Customize the student experience
Decide how much a candidate sees after submitting: instant results, correct answers, and explanations can all be toggled on or off. You can also adjust how scores, correct answers, and result breakdowns are displayed, which lets you dial grading transparency up or down depending on how strict the exam needs to be.
Step 6: Review exam analytics
After candidates start submitting, the dashboard gives you an overview of total, completed, and upcoming exams along with participant counts. A histogram shows grade distribution so you can spot trends at a glance, and you can track pass/fail averages over time to see whether your course content is actually preparing people for the exam.
How the different exam settings work together
Setting up an exam is not only about adding questions. The Exam Add-on for LearnPress gives you several controls that work together to shape how candidates move through the assessment.
Start with the question bank. Instead of creating a completely new set of questions every time you need an exam, you can reuse questions and organize them by category. The available question types include single choice, multiple choice, true/false, and fill-in-the-blank questions. This gives you a flexible base for building different assessments from the same pool of questions.
Next, consider how candidates access and complete the exam. Start and end dates determine when the exam is available, while duration controls how long candidates have to complete it. You can also define attempt limits, randomize questions, and require a passing score. These settings allow you to make the exam more controlled when consistency between candidates matters.
The candidate experience is another part of the setup. You can decide whether candidates see instant results, correct answers, and explanations after submitting their work. Display settings also let you control how scores, correct answers, and result breakdowns appear. This is useful when you want to provide immediate feedback in one type of assessment but keep results more controlled in another.
Finally, analytics close the loop. The exam overview shows total, completed, and upcoming exams, along with participant counts. The grade distribution histogram gives you a quick view of how scores are spread across candidates, while pass/fail averages help you monitor performance over time.
Together, these settings turn the add-on from a simple question-and-answer tool into a complete standalone assessment workflow: build questions, assemble an exam, control access and attempts, manage the candidate experience, and review the results afterward.
Key features that make exam setup easier
A few features are worth calling out on their own, since they directly shape how much setup time you’ll spend and how much you can scale.
Flexible question bank
Reusing categorized questions instead of writing new ones for every exam is the single biggest time-saver in the setup process. Once your bank is organized, assembling a new exam is closer to picking questions off a shelf than writing a test from scratch.
Auto-marked grading
Objective question types are graded instantly and automatically. That means you can scale to hundreds of candidates without hiring extra graders, since the grading cost for objective questions is effectively zero once the exam is built. The add-on also supports manual grading where it’s needed, so open-ended assessment isn’t off the table.
Anonymous access for candidates outside your courses
Anonymous access means you’re not limited to people who already bought a course. You can open an exam to anyone, which turns the exam itself into an acquisition channel, not just an assessment tool.
Exam analytics and grade distribution
Beyond pass/fail numbers, the grade distribution histogram shows you where scores cluster, which is useful for spotting whether an exam is too easy, too hard, or whether a specific section of your course content needs rework.
Pricing and licensing
Here’s the current pricing structure at a glance:
| Item | Price |
|---|---|
| Lifetime license (1 site), regular price | $39 |
| Lifetime license (1 site), sale price | $19 |
| Coupon (LPAUG2026, selected add-ons) | 25% off |
| +1 year of updates & support | $13 |
| +2 years of updates & support | $25 |
| +3 years of updates & support | $34 |
The license covers one active site at a time. If you need to move it, you can deactivate the key on one environment and reactivate it on another, but only one installation receives updates and support at a time. After your 12-month update and support window expires, the add-on keeps working; you just won’t get new updates or support access until you renew.
Tips for getting more out of your exams
A few practical notes worth keeping in mind once the add-on is live:
- Test on staging first. Since this is a version 1.0.0 release, run through the full exam flow, from question bank to submission to results, on a staging site before opening it to real candidates.
- Use categories from day one. Tagging questions by category as you build the bank saves far more time later than trying to organize hundreds of questions after the fact.
- Set a completion window, not just a time limit. A duration controls how long the exam takes; a completion window controls how long after enrollment a candidate has to start it. Both matter for fairness.
- Check the changelog before every update. Because the plugin is still on its first release, changelog entries are worth reading before you update a live site.
- Keep documentation open while configuring settings. The official setup docs walk through each option in the exam builder in more detail than a general overview can cover.
FAQs
Does the Exam add-on support manual grading as well as automatic grading?
Yes. Objective question types such as single choice, multiple choice, and true/false are graded automatically and instantly, while the add-on also supports manual grading for cases that need a human reviewer.
How many licenses do I get with one purchase?
One purchase gives you a lifetime license for a single site, along with 12 months of updates and support. You can move the license between environments by deactivating and reactivating the key, but only one active installation receives updates and support at any given time.
What happens to the add-on after my update and support period ends?
The plugin remains functional after the 12-month period ends. You won’t receive further updates or support access until you renew, which you can do in one, two, or three-year increments at checkout.
Which WordPress and LearnPress versions does the add-on support?
The current release, version 1.0.0 as of 07 July 2026, lists compatibility with WordPress 7.0 and requires the core LearnPress plugin to be active. Check your own WordPress version against the listed compatibility before activating it, since this is a first release and requirements may shift with future updates.
Conclusion
Setting up the Exam Add-on for LearnPress comes down to six steps: install the plugin and register your license, build a categorized question bank, create the exam, configure timing and access rules, decide how much students see after submitting, and then use the analytics dashboard to see how candidates are actually performing. Once it’s configured, you get a standalone assessment layer that proves real learning rather than just course completion, with grading and reporting that scale without adding manual work on your end. If you want the deeper configuration reference while you set things up, the official LearnPress documentation covers every setting in the exam builder in more detail.