If you have ever wanted a small piece of custom functionality on your site but did not want to hire a developer, you already know the appeal of building your own plugin. The good news is you do not need years of PHP experience to get started. There are now several ways to create WordPress plugin online without touching a code editor, and a few more advanced routes if you want full control over the result.
This guide walks through both paths: using a browser-based plugin generator for a quick build, and writing a plugin from scratch when you need something more specific. By the end, you will know which method fits your project and how to test your plugin safely before it goes live.
LearnPress – WordPress LMS Plugin
We provide an amazing WordPress LMS plugin to create & sell online courses. Let’s find out!
Try NowWhat counts as a WordPress plugin
A WordPress plugin is a package of PHP code that adds or changes functionality on a WordPress site without editing the core files or the active theme. Plugins can be as small as a single function, like adding a shortcode, or as large as an entire e-commerce system.
Every plugin starts with a main PHP file that contains a header comment block. WordPress reads that header to know the plugin name, version, and author, and this is what shows up in the Plugins screen inside wp-admin. Everything else, from admin settings pages to database tables, is optional and depends on what the plugin needs to do.
Why build a plugin instead of using an existing one
The WordPress plugin directory has over 60,000 free plugins, so it is fair to ask why anyone would build their own. In practice, there are a few recurring reasons site owners go this route:
- You need one specific feature. Installing a large plugin just to get one small function adds unnecessary weight to your site and can slow down page load times.
- You want full ownership of the code. A custom plugin will not suddenly change its settings layout after an update, and you decide when and if it changes at all.
- You are testing an idea. Site owners building a product, a membership add-on, or an LMS extension often start with a quick prototype before investing in a full development cycle.
- You want to avoid plugin conflicts. Every additional third-party plugin is one more thing that can clash with your theme or with another plugin. A lean, purpose-built plugin reduces that risk.
How to create WordPress plugin online with a generator tool
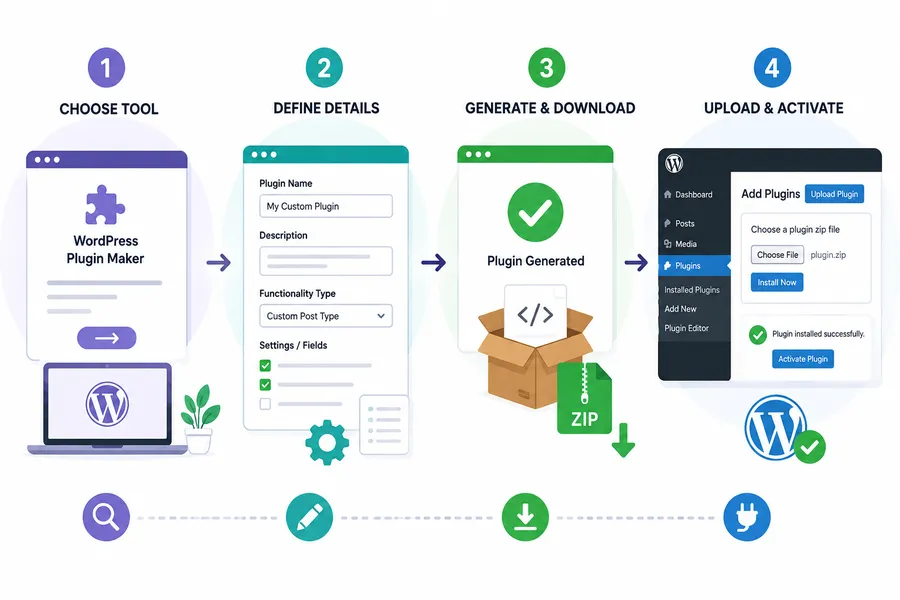
The fastest way to create WordPress plugin online is through a browser-based plugin generator. These tools ask you a series of questions, plugin name, description, functionality type, and then output a ready-to-upload ZIP file. You never open a code editor.
A WordPress plugin generator works well for straightforward tasks: custom post types, shortcodes, simple admin settings pages, widgets, and basic REST API endpoints. Here is the general workflow most tools follow.
Step 1: Choose a WordPress plugin maker tool
Search for a WordPress plugin maker and pick one that matches your skill level. Some tools focus on generating a boilerplate structure for developers to extend, while others generate a fully functional plugin with no coding required at all. Check whether the tool supports the WordPress version and PHP version your host is running before committing to it.
Step 2: Define your plugin details
Most plugin generator tools ask for the same core information:
- Plugin name and slug
- Description and author details
- The type of functionality (custom post type, shortcode, admin page, widget, and so on)
- Any fields or settings the feature needs
Fill these in carefully. The plugin name becomes the folder name and the text domain used for translations, so avoid special characters and keep it descriptive.
Step 3: Generate and download the plugin
Once you submit the form, the WP plugin generator compiles the PHP files, packages them into a ZIP archive, and gives you a download link. Open the ZIP briefly to confirm the folder structure looks correct, one main folder containing a PHP file with the header comment at the top.
Step 4: Upload to your WordPress site
In your dashboard, go to Plugins > Add New > Upload Plugin, select the ZIP file, and click Install Now. After installation, click Activate. If the plugin does not appear correctly in the Plugins list, the ZIP file structure is usually the culprit, most often an extra nested folder created during packaging.
Building a plugin manually with code
A plugin generator online tool covers a lot of ground, but there are cases where writing the plugin yourself makes more sense: complex business logic, custom database tables, or integrations with a specific theme’s hooks. Manual development also gives you full transparency into exactly what the code does, which matters if the plugin will handle sensitive data.
Set up a local development environment
Install a local server stack such as LocalWP, XAMPP, or DevKinsta so you are not editing files directly on a live production site. Working locally lets you break things safely while you figure out how a hook or filter behaves.
Create the plugin folder and main file
Inside wp-content/plugins, create a new folder using your plugin’s slug, then add a PHP file with the same name. At the top of that file, add the required header comment:
/*
Plugin Name: Your Plugin Name
Description: A short description of what it does.
Version: 1.0.0
Author: Your Name
*/
Add your functionality using WordPress hooks
WordPress plugins interact with the platform through actions and filters rather than editing core files directly. For example, add_action('init', 'your_function_name') runs your custom function during the WordPress initialization process. This hook-based approach is what makes plugins update-safe: WordPress core can update without breaking your custom code, because your code never touched core in the first place.
Keep the codebase organized
Even a small plugin benefits from separating concerns early. A common structure looks like this:
| Folder or file | Purpose |
|---|---|
| your-plugin.php | Main file with the plugin header and bootstrap code |
| includes/ | Core PHP classes and functions |
| admin/ | Admin-facing settings pages and screens |
| assets/ | CSS and JavaScript files |
| languages/ | Translation files for internationalization |
This structure is not required for a two-function plugin, but it saves time the moment the plugin grows past its first version.
Testing and installing your plugin
Before activating any custom or generated plugin on a live site, run through a short checklist:
- Check for PHP errors. Enable WP_DEBUG in wp-config.php on a staging site and watch for warnings or fatal errors on activation.
- Test with default themes. Activate a default theme like Twenty Twenty-Four temporarily to confirm the issue you are seeing is not theme-related.
- Check for plugin conflicts. Deactivate other plugins one at a time if something breaks after activation, this isolates the conflicting plugin quickly.
- Confirm the uninstall behavior. Decide whether your plugin should remove its data on uninstall or leave settings intact, and code that behavior deliberately rather than leaving it undefined.
- Back up before going live. Even a simple plugin can touch the database in ways you did not anticipate, so a full backup before activation on production is worth the two minutes it takes.
Common mistakes to avoid
Before publishing or installing your plugin, watch out for these common mistakes that can cause translation, customization, security, or update issues:
- Skipping the text domain. If you plan to translate the plugin later, set the text domain correctly from the start rather than retrofitting it.
- Hardcoding values that should be settings. Anything a site owner might reasonably want to change, colors, limits, labels, belongs in a settings page, not directly in the code.
- Ignoring sanitization and escaping. Any data coming from a form or database call should be sanitized on the way in and escaped on the way out, this is one of the most common security gaps in beginner plugins.
- Not versioning your plugin. Increment the version number in the header comment with every change so you and WordPress both know which build is active.
Using a custom plugin with LearnPress
If your site runs on LearnPress, a custom plugin is often the cleanest way to extend the LMS without modifying LearnPress core files directly. LearnPress exposes its own set of hooks and filters, so a small add-on plugin can adjust course layouts, add custom certificate logic, or connect course completion data to another tool, all while staying compatible with future LearnPress updates.
Building the extension as a separate plugin, rather than editing theme or plugin files directly, means your customizations survive updates instead of getting overwritten.
Comparing plugin generator options
Not every WordPress plugin generator is built for the same audience. Use this table as a starting point when comparing tools.
| Tool type | Best for | Coding required | Output |
|---|---|---|---|
| No-code plugin generator | Beginners, simple features | None | Ready-to-install ZIP file |
| Boilerplate generator | Developers who want a starting structure | Yes, moderate | Skeleton plugin with folders and hooks pre-wired |
| CLI scaffolding tool | Developers comfortable with the command line | Yes | Local plugin folder generated via terminal commands |
| Manual build | Anyone needing full control or complex logic | Yes, full | Fully custom PHP plugin |
Match the tool to the complexity of what you are building. A no-code generator is the right call for a shortcode or a simple custom post type. Anything involving custom database tables, third-party API integrations, or complex admin logic tends to outgrow generator tools quickly and is better handled with manual code.
Maintaining your plugin after launch
Building the plugin is only half the job. Once it is active on a live site, a bit of ongoing maintenance keeps it from becoming a liability.
- Watch for WordPress core updates. Major WordPress releases occasionally change how certain hooks or functions behave. Test your plugin on a staging copy of the site before a major core update rolls out to production.
- Track PHP version changes. Hosts periodically bump the default PHP version, and older plugin code sometimes throws deprecation warnings or fatal errors on newer PHP versions. Running your plugin through a staging environment on the newer PHP version catches this early.
- Log changes with a changelog. Even a short changelog inside the plugin’s readme file helps you remember what changed between versions, especially useful if you step away from the project for a few months and come back to it later.
- Review security regularly. If your plugin handles form submissions, user data, or file uploads, revisit the sanitization and validation logic every so often rather than assuming the original code still covers every edge case.
None of this needs to be complicated. A five-minute check after each WordPress core update is usually enough to catch problems before they reach visitors.
FAQs about create a WordPress plugin online
Is it safe to use an online WordPress plugin generator?
It can be safe as long as you download the generated ZIP file and review the code before activating it on a live site. Avoid generators that ask for your WordPress admin login directly, and always test the plugin on a staging environment first.
Do I need to know PHP to create a WordPress plugin online?
No, a basic plugin generator lets you build simple functionality like shortcodes or custom post types without writing any PHP yourself. However, knowing basic PHP helps you troubleshoot issues and extend the plugin later if your needs grow.
Can a plugin I create online be submitted to the WordPress.org plugin directory?
Yes, as long as the code meets WordPress.org’s plugin guidelines, including proper sanitization, a GPL-compatible license, and no obfuscated code. Plugins generated by automated tools sometimes need manual cleanup before they pass the directory’s review process.
What is the difference between a plugin generator and a page builder?
A plugin generator creates backend functionality such as custom post types, database interactions, or admin settings, while a page builder like Elementor focuses on front-end layout and design. The two solve different problems and are often used together on the same site.
Conclusion
Whether you reach for a WordPress plugin maker to move fast or write the code yourself for full control, the process comes down to the same core steps: define what the plugin needs to do, build it in a safe environment, test it thoroughly, and install it carefully. Start with a generator tool if your needs are simple, and move to manual development once your plugin needs more than a generator can offer. Either way, testing on staging before activating on a live site is the step that saves the most headaches later.
Read more: How to find the best online digital marketing courses?