Payment integration is the process of connecting your website to a payment provider so customers can pay you online and the money lands in your bank account. If you sell products, memberships, or online courses, this is the step that turns visitors into paying customers.
This guide walks you through the full process, from planning to going live, with practical steps for WordPress site owners.
LearnPress – WordPress LMS Plugin
We provide an amazing WordPress LMS plugin to create & sell online courses. Let’s find out!
Try NowTable of Contents
What payment integration means and how it works
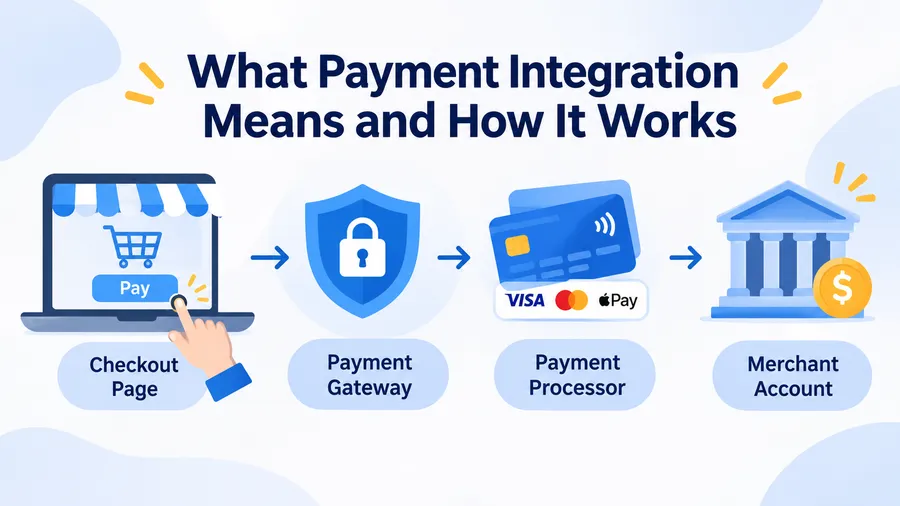
Payment integration is the technical connection between your website, a payment gateway, and a payment processor that lets you accept cards and digital wallets safely. Once it is set up, a customer clicks “Pay,” the data moves through encrypted channels, and your site receives a clear approved or declined answer.
The main parts of a payment flow
A payment gateway for website checkout is the service that encrypts card details and passes them to the processor. Think of it as the digital card terminal of your store. Four parts work together on every order:
- Checkout page: the page on your site where the customer enters payment details.
- Payment gateway: the service that secures the data and sends it forward.
- Payment processor: the company that talks to the card networks and the customer’s bank.
- Merchant account: the account that receives your money. Many providers, such as Stripe and PayPal, bundle this with the gateway.
Hosted, embedded, and API-based connections
Most providers offer three ways to connect, and the one you choose affects both security work and checkout design.
- Hosted checkout: the customer is sent to the provider’s page to pay. This is the easiest option and keeps most card data away from your server.
- Embedded fields: the card form appears inside your own checkout, but the sensitive fields are served by the provider. You get a smoother design with limited extra responsibility.
- Direct API: your server handles payment data and talks to the provider directly. It gives full control, but it also brings the heaviest security duties. Most small sites should avoid it.
How to choose a payment integration platform
The right payment integration platform depends on where your customers live, what you sell, and how you want to get paid. Spend time on this choice before you install anything, because switching gateways later means redoing tests and sometimes rebuilding checkout pages.
Questions to ask before you decide
Write down your answers to these points first:
- Which countries and currencies do you need to support?
- Do you sell one-time products, subscriptions, or both?
- Which payment methods do your customers expect: cards, PayPal, Apple Pay, Google Pay, bank transfer, or local wallets?
- How fast do you need payouts, and what are the fees per transaction?
- Is there a maintained plugin for your platform, such as WooCommerce or LearnPress?
- How does the provider handle refunds, disputes, and failed recurring payments?
Comparison of popular payment options
The table below gives a general view of common choices. Fees, supported countries, and features change often, so check each provider’s current pricing page before you decide.
| Option | Integration style | Best for | Main trade-off |
|---|---|---|---|
| PayPal | Hosted button or pop-up | Shops whose buyers already trust PayPal wallets | Buyers may leave your page during checkout |
| Stripe | Embedded fields and API | Cards, wallets, and subscriptions with a modern checkout | Availability and features vary by country |
| Authorize.net | Gateway with API and hosted forms | Merchants who already use it or need a traditional gateway | Pricing includes gateway fees, so compare total cost |
| Regional gateways (for example Razorpay, Mollie, Paystack) | Hosted or embedded | Local cards, bank methods, and local currency | May need a third-party plugin and extra testing |
| Offline or bank transfer | Manual confirmation | Small sellers and low-volume sales | No instant access and more admin work |
If you are unsure, start with one well-known gateway and add a second option later, such as PayPal, once your first one is stable.
Step-by-step online payment integration
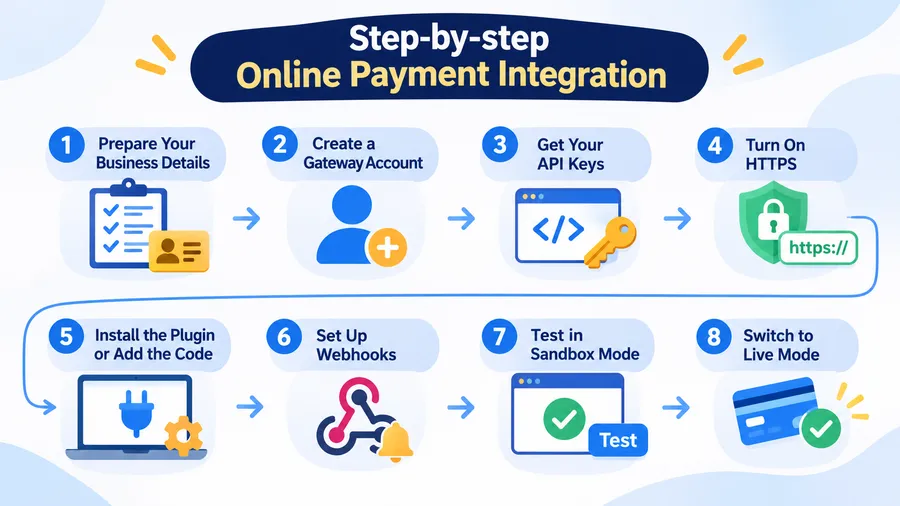
Online payment integration follows the same pattern on almost every platform: create the account, get your keys, connect the plugin or code, then test before you accept real money. These eight steps will help you avoid the usual delays.
Step 1: Prepare your business details
Gather your legal business name, address, bank account details, and a government ID if the provider asks for it. Most gateways run identity checks before they allow live payments. Starting this early saves days of waiting.
Step 2: Create your gateway account
Sign up with your chosen provider and finish the verification form. You will normally get a test mode (sometimes called a sandbox) right away, even before the live account is approved. Use test mode for all your early work.
Step 3: Get your API keys
In the provider’s dashboard, find the developer or API section. You will see two sets of keys: test keys and live keys. Copy them to a safe password manager. Never paste secret keys into public pages, theme files, or support tickets.
Step 4: Turn on HTTPS
Your whole site must load over HTTPS before you accept payments. In WordPress, check Settings > General and make sure both the WordPress Address and Site Address start with https. Also look for mixed content warnings in your browser, because a single insecure script can break the checkout.
Step 5: Install the plugin or add the code
For a WordPress site, the safest path is to use an official plugin from the provider or from your store or LMS plugin. Install it from Plugins > Add New, activate it, then paste in your test keys. Back up your site first, and use a child theme if you plan to edit any checkout template files.
Step 6: Set up webhooks
A webhook is a message your payment provider sends to your website when something happens, such as a successful payment, a refund, or a failed renewal. Without webhooks, a customer may pay but your site may never unlock the product or course. Add your webhook URL in the provider dashboard and, if the plugin supports it, enter the webhook secret so your site can verify each message.
Step 7: Test every scenario in sandbox mode
Use the test card numbers published in your provider’s documentation. Do not just test a successful payment. Also test a declined card, a refund, a coupon, and a repeat purchase. If you accept subscriptions, test a renewal as well. Check that the order status, the customer email, and the access rights all update correctly.
Step 8: Switch to live mode
Replace the test keys with live keys, confirm the live webhook, and run one small real transaction with your own card. Refund it afterward. This last check proves that your payment integration system works from the first click to the bank deposit.
Payment integration on WordPress with WooCommerce
WooCommerce is the most common way to sell physical or digital products on WordPress, and its payment settings are easy to find. The plugin handles the cart and order records, while your gateway handles the money.
Connecting a gateway in WooCommerce
Go to WooCommerce > Settings > Payments. You will see the available methods, and you can enable or disable each one. Click Manage on the gateway you want, enter your keys, choose the capture mode, and save. Place a test order from a private browser window to see the checkout the way a customer sees it.
Settings that are easy to miss
A few options affect conversions more than people expect. Check the order status set after payment, the statement descriptor (the name that appears on bank statements), and the saved card option for returning customers. A clear descriptor reduces chargebacks, because buyers recognize the charge.
Payment integration for course sites with LearnPress and Eduma
If you run an online school, you need a payment gateway for website enrollments that unlocks courses as soon as payment clears. LearnPress is a free WordPress LMS plugin that lets you build courses, lessons, and quizzes and charge for them. In LearnPress > Settings > Payments, you can enable the built-in methods and manage your checkout options.
Using LearnPress add-ons for more gateways
LearnPress supports extra payment methods through add-ons, such as Stripe, Authorize.net, and a WooCommerce Payment add-on that lets you reuse any WooCommerce gateway. This is useful when your students want local methods that LearnPress does not include by default. Check the LearnPress add-on list for the current options, since available add-ons and their requirements may change between versions.
Why Eduma helps
Eduma is an education WordPress theme from ThimPress that is built to work with LearnPress. Because the theme and the LMS plugin are designed together, your course page, cart, and checkout share the same layout, and you do not need to fix style conflicts by hand. If you plan to sell courses, a LearnPress and Eduma setup keeps online payment integration simple: install the theme, activate LearnPress, enable a payment method, and test an enrollment before you promote the course.
Tip: Always test enrollment as a new student. Confirm that the course appears in the student’s profile right after payment, and that the receipt email arrives.
Security and compliance checklist
Security is part of every good payment integration, not an extra step at the end. Use this list before launch and review it every few months.
- Use HTTPS everywhere: an SSL certificate is the minimum.
- Do not store card numbers: let the gateway store and tokenize them. This keeps your PCI DSS scope small. The PCI Security Standards Council publishes the official rules.
- Keep everything updated: WordPress core, themes, and payment plugins should receive updates promptly after you test them.
- Protect admin access: use strong passwords, two-factor authentication, and limited user roles.
- Verify webhooks: check the signature on each message so nobody can fake a paid order.
- Support strong customer authentication: in many regions, 3D Secure is required for card payments.
- Publish clear policies: add refund, privacy, and terms pages, and link them near the pay button.
Common mistakes to avoid
Most failed launches come from small oversights. These are the problems that appear most often when a team connects an online payment integration for the first time.
Leaving test keys in place
Orders look normal on the site, but no real money moves. After switching to live mode, always place one real payment.
Caching the checkout page
Caching plugins can store cart or checkout pages and show customers the wrong data. Exclude the cart, checkout, and account pages from page caching.
Skipping webhooks
Redirect-based confirmations can fail if a buyer closes the tab early. Webhooks give your site a second, reliable signal.
Ignoring mobile checkout
Many buyers pay on a phone. Test the full flow on a small screen, and check that wallet buttons and form fields are easy to tap.
Choosing a payment integration platform without checking support
A provider with no active WordPress plugin means more custom work and more risk. Look at the plugin’s update history, reviews, and support replies before you commit.
Conclusion
Payment integration is easier when you follow a clear order: choose a gateway that fits your market, get your keys, connect a trusted plugin, set up webhooks, test every scenario, and only then go live. Keep security basics in place and review your settings after each major update. If you run a course site, LearnPress with the Eduma theme is a practical way to combine your lessons and your checkout in one place. Start with one reliable payment method, confirm that it works end to end, and add more options as your audience grows.
FAQs
How long does payment integration take?
A simple setup with a ready-made plugin can take a few hours, plus the time the provider needs to verify your business. Custom API work, subscriptions, or multiple currencies can take days or weeks. Account approval is usually the slowest part, so apply early.
How much does payment integration cost?
Most providers do not charge a setup fee, but they take a fee on each transaction, and some add monthly or gateway fees. Premium plugins and developer time may add to the total. Compare the full cost per sale, not just the headline percentage.
Can I use more than one payment gateway on the same website?
Yes. WooCommerce and LMS plugins like LearnPress let you enable several methods, so customers can choose at checkout. Keep the list short, usually two or three, because too many choices can confuse buyers and increase your testing work.
Do I need a developer to connect a payment gateway?
Not for common setups. Official plugins let most site owners finish the work with settings pages and copied keys. You should hire a developer if you need custom checkout flows, a direct API connection, or complex tax and invoice rules.
Read more: Learning Flash Cards: 6 Best Online Tools