
If you run exams on LearnPress, getting the timing and retake rules right is what separates a fair test from a frustrating one.
LearnPress exam time limits and retake policies live inside the Exam Add-on’s Settings tab, and once you know where each option sits, setting up a new exam takes a few minutes rather than a few tries.
This guide walks through every setting that controls how long students have, when they can attempt the exam, and how many times they can retake it.
LearnPress – WordPress LMS Plugin
We provide an amazing WordPress LMS plugin to create & sell online courses. Let’s find out!
Try NowTable of Contents
Where to configure LearnPress exam settings
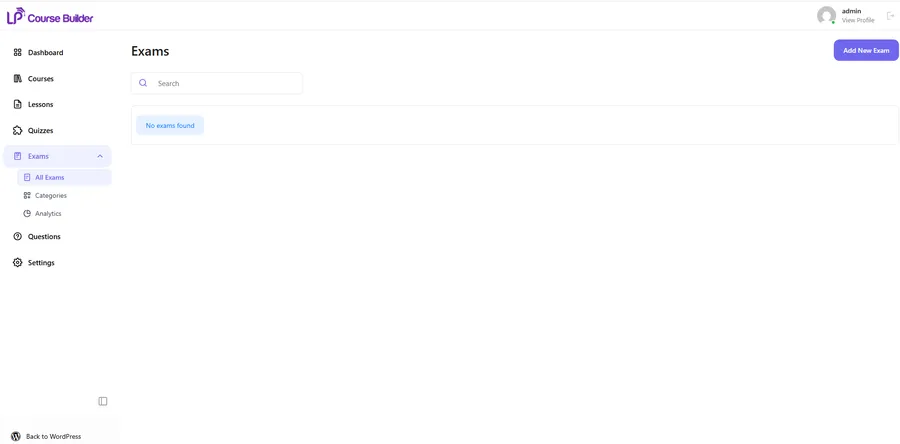
Before you can touch any timing or retake option, you need an exam to attach it to. LearnPress assessment configuration starts in the WordPress admin, under LearnPress → Exams → All Exams, which is the central page for every exam on the site.
Setting up the exam basics in the Overview tab
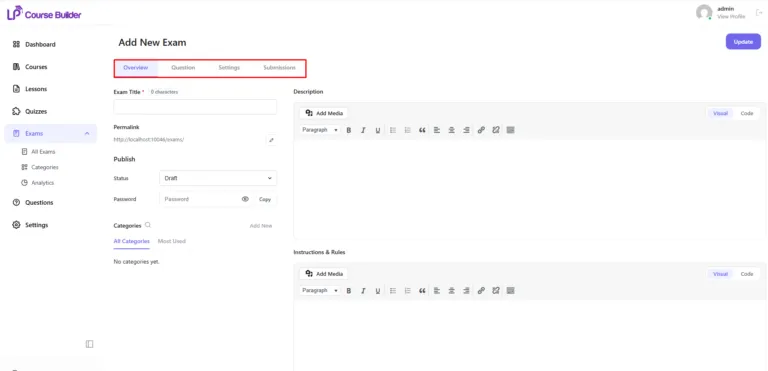
Click Add New Exam and you land in the exam editor. The Overview tab is where you fill in the Exam Title, adjust the Permalink if needed, write a Description, and add Instructions & Rules for students to read before they start. You also set the Status to Draft while you’re still working, choose a Password if the exam needs to be gated, and assign Categories to keep exams organized. These fields set up the basic exam information before you move on to questions and advanced settings.
Publishing before you can add questions
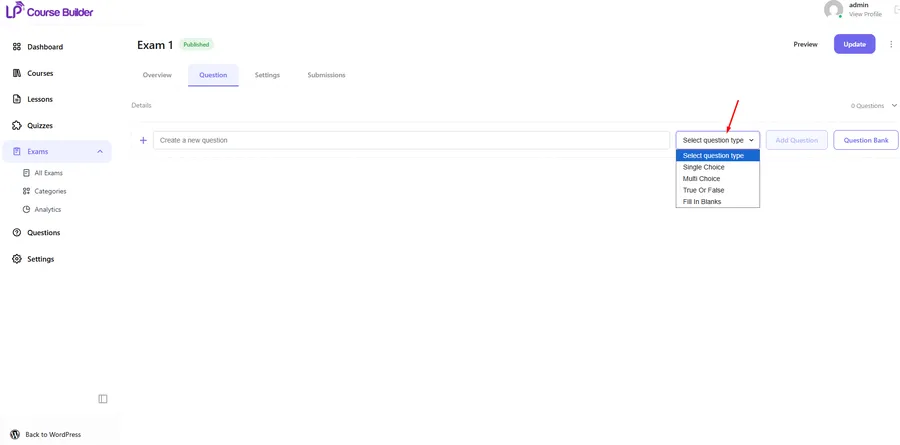
Here’s a detail that trips up a lot of first-time users: the Question tab stays greyed out until the exam is published. So the workflow is Overview first, click Update, set Status to Published, and only then does LearnPress unlock the Question tab, where you either write new questions (Single Choice, Multiple Choice, True or False, or Fill in the Blanks) or pull existing ones in from the Question Bank. Once questions are in place, the real work of configuring LearnPress exam time limits and retake policies happens in the Settings tab.
How to set a timer for LearnPress exams
The Settings tab is split into four sections, and the first one, General, is where the actual clock lives. This is the section to open if someone on your team asks how to set a timer for LearnPress exams.
Start and end date & time
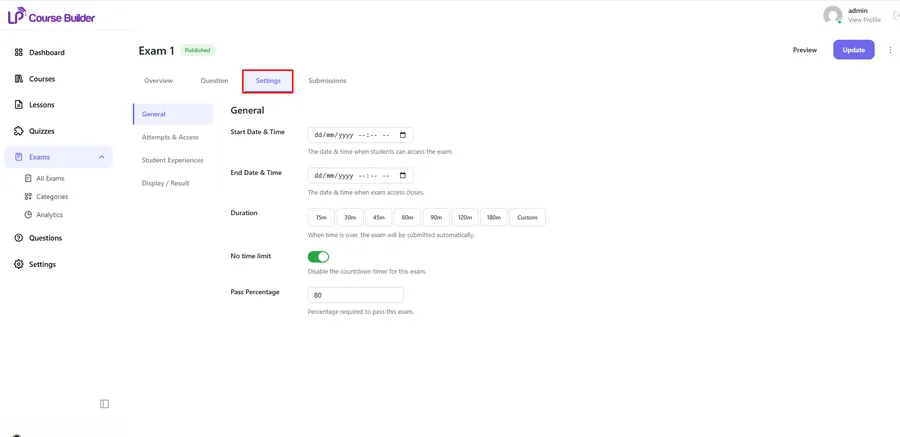
Start Date & Time controls when students are allowed in at all. Try to open the exam before that moment and LearnPress simply won’t let you. End Date & Time works the same way in reverse: once it passes, access closes automatically, unless you’ve separately turned on Allow Late Access under Attempts & Access. Setting both fields gives you a fixed exam window, which matters if you’re running a certification exam that needs to happen on a set day rather than whenever a student feels like it.
Duration and the no time limit option
Duration sets how long a student has once they open the exam, and when that time runs out, LearnPress submits the exam automatically. That’s a meaningful behavior to know in advance, because it means a student who gets distracted mid-exam doesn’t lose their answers, the system just closes things out and grades whatever was completed. If you’d rather not run a countdown at all, for example for a low-stakes practice exam, the No Time Limit toggle removes the timer entirely so students can work at their own pace.
Pass percentage
Pass Percentage is the last piece of the General section, and it’s simply the minimum score a student needs to be marked as Passed. It doesn’t affect the clock, but it works alongside the timing settings to define what a “successful attempt” actually looks like.
LearnPress exam retake limits and access rules
Once timing is sorted, the Attempts & Access section is where you decide how forgiving the exam is. This is the section that actually governs LearnPress exam retake limits.
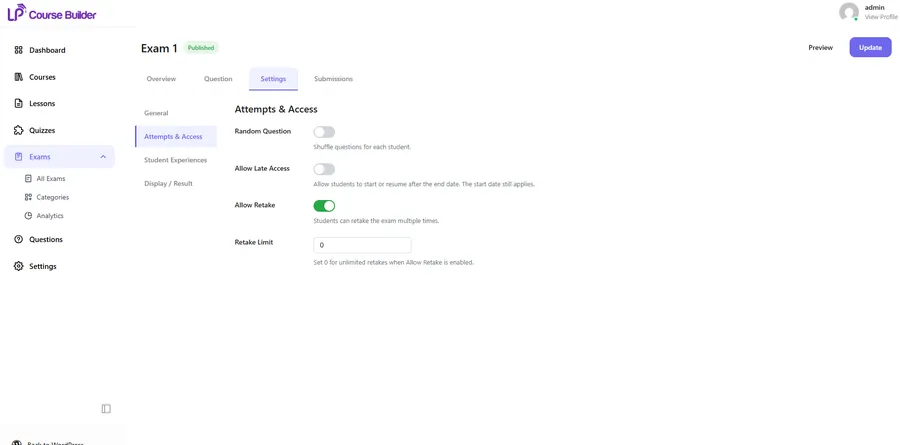
Allow retake and retake limit
Allow Retake is the switch that lets students attempt the exam more than once. Turn it on and the Retake Limit field becomes relevant: enter a specific number to cap attempts, or enter 0 to allow unlimited retakes. A certification-style exam usually wants a hard limit here, while a low-stakes knowledge check can reasonably allow unlimited attempts.
Random question order
Random Question shuffles the order questions appear in for each student. It’s a straightforward way to cut down on students comparing notes on “question 3” mid-exam, and it’s worth combining with retake limits if you’re allowing multiple attempts, since a shuffled order makes memorized answer positions less useful on a second try.
Allow late access
Allow Late Access lets students start or resume the exam after the End Date & Time has passed. It’s useful for handling makeup attempts without having to edit the exam’s schedule, though it’s worth noting that students still can’t get in before the Start Date & Time no matter what this setting does.
Student experience settings that affect timing
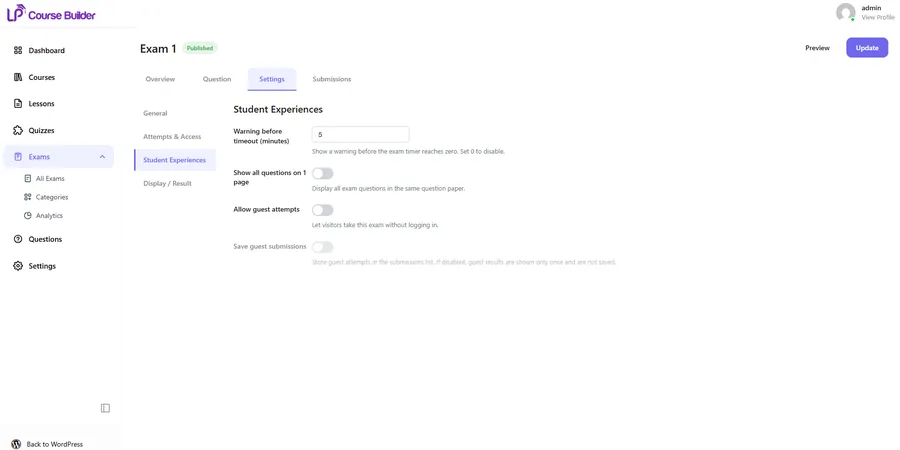
The third Settings section, Student Experience, doesn’t set the clock itself, but it shapes how students experience the time limit you’ve configured.
Warning before timeout
Warning Before Timeout (Minutes) triggers an on-screen alert a set number of minutes before the exam auto-submits. Set it to 0 to turn the warning off entirely. For any exam with a real Duration set, this is worth turning on, since a silent countdown that just ends the exam without notice is a common source of student complaints.
One page vs. guest access
Show All Questions on 1 Page changes the layout from multiple pages to a single scrollable page, which some students find easier to manage against a countdown. Allow Guest Attempts opens the exam to visitors who aren’t logged in at all, and Save Guest Submissions decides whether those guest results get stored in the submission list or only shown once immediately after the guest finishes.
Display and result options after submission
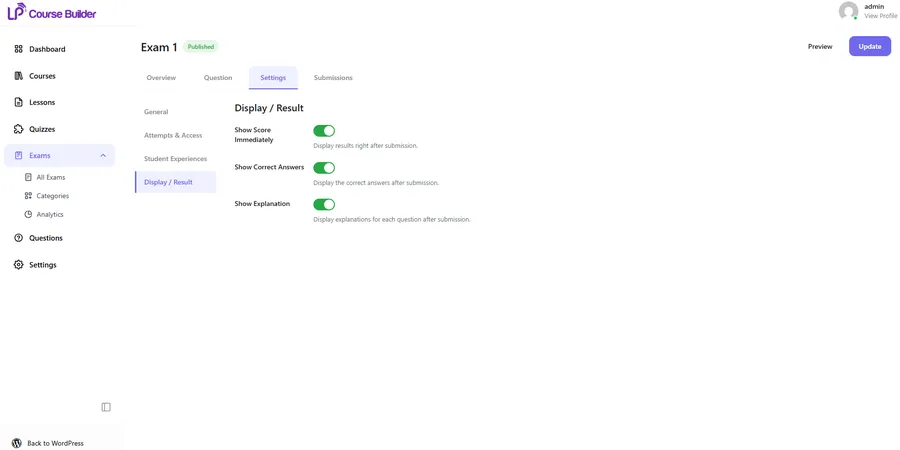
The final Settings section, Display / Result, controls what a student sees once the exam closes, whether that’s because they hit submit or the timer ran out.
Show Score Immediately displays the student’s score as soon as the exam is submitted. A second toggle in the same section reveals the correct answers for each question, and Show Explanation adds the reasoning behind each answer once results are shown. None of these change the timing rules, but they do affect how much information a student walks away with immediately after an attempt, which matters if you’re planning to let them retake the exam and don’t want them memorizing the answer key on their first pass.
Settings summary table
| Section | Setting | What it controls |
|---|---|---|
| General | Start / End Date & Time | The window during which the exam is accessible |
| General | Duration | How long a student has once they open the exam |
| General | No Time Limit | Removes the countdown timer entirely |
| General | Pass Percentage | Minimum score required to be marked Passed |
| Attempts & Access | Allow Retake / Retake Limit | Whether retakes are allowed and how many (0 = unlimited) |
| Attempts & Access | Random Question | Shuffles question order per student |
| Attempts & Access | Allow Late Access | Access after the End Date & Time has passed |
| Student Experience | Warning Before Timeout | Alert shown before auto-submit (0 = disabled) |
| Student Experience | Allow / Save Guest Attempts | Whether non-logged-in users can take and keep results |
| Display / Result | Show Score / Answers / Explanation | What students see after submitting |
Tracking attempts in the Submissions tab
Everything you configure in Settings shows up as data in the Submissions tab, which lists every attempt for that exam. Each row includes the Session, the User, the current Status such as In Progress or Submitted, the Score, when the attempt Started and was Submitted, the Time Taken, and Actions for reviewing that specific attempt. Each exam attempt is recorded as a separate session, making it easier to review a student’s submission history.
LearnPress is one of the most widely used LMS plugins for WordPress, and the Exam Add-on for LearnPress builds standalone, gradable exams on top of it that don’t have to be tied to a specific course. That separation is what makes it possible to run a certification-style exam with strict timing and retake rules, or open the same kind of exam to anonymous visitors as a lead-generation exercise, without restructuring how your courses work.
Choosing the right settings for different exam types
The same four Settings sections can produce very different exam experiences depending on how you combine them. Rather than treating each setting in isolation, it helps to think about the type of exam you’re building first, then match the timing and retake rules to that goal.
Certification exams
A certification exam is meant to prove a specific standard was met, so the timing and retake rules should be strict. Set a fixed Duration instead of No Time Limit, require a defined Start and End Date & Time so every candidate tests under the same window, turn on Random Question so answer sequences can’t be shared, and keep Retake Limit low, often just one or two attempts, so the credential actually means something. Pairing this with Warning Before Timeout is worth doing here specifically, since a candidate losing points to a surprise auto-submit undermines the fairness the whole exam is supposed to represent.
Practice exams and self-paced review
If the goal is reinforcing what a student already learned rather than gatekeeping a credential, the settings can loosen considerably. No Time Limit removes the pressure of a countdown, Allow Retake with Retake Limit set to 0 lets students come back as many times as they want, and turning on Show Score Immediately along with the correct-answers and explanation toggles under Display / Result gives them instant feedback to learn from. Random Question is still worth keeping on here too, since it stops a student from simply memorizing question order instead of the material.
Lead-generation and open-access exams
Some LearnPress sites use exams as a way to reach people who haven’t enrolled in a course at all, essentially a public assessment that doubles as a marketing touchpoint. Allow Guest Attempts is the setting that makes this possible, and turning on Save Guest Submissions ensures those results end up in the Submissions tab instead of disappearing after a single view. Combine this with a moderate Duration and a reasonable Pass Percentage, and you get an exam that’s approachable enough for a first-time visitor but still substantial enough to be worth completing.
Tracking retake behavior over time
Because every attempt shows up as its own row in the Submissions tab, retake limits aren’t just a one-time configuration decision, they’re something you can verify against real data. If Retake Limit is set to a fixed number and a student’s Session rows stop appearing after that count, the limit is working as expected. If Allow Late Access is turned on, checking the Started and Submitted timestamps against the exam’s End Date & Time is the quickest way to confirm which sessions came in through the late-access window rather than the original schedule. This is also where Time Taken becomes useful for tuning Duration itself: if most students are finishing well under the time limit, it may be worth shortening Duration on the next version of the exam, and if a large share of students are getting auto-submitted before finishing, that’s a signal Duration is too tight for the amount of content in the Question tab.
FAQs about LearnPress exam time limits and retake policies
Can students see how much time is left during a LearnPress exam?
When a Duration is set, the exam uses the configured time limit, and the Warning Before Timeout option can alert students before the time expires.
What happens if a student runs out of time on a LearnPress exam?
The exam is submitted automatically once the Duration limit is reached, and whatever answers were completed at that point are graded. Turning on No Time Limit removes this behavior entirely by disabling the countdown.
How many times can a student retake a LearnPress exam?
That depends entirely on how you configure the Retake Limit setting under Attempts & Access. Enter a specific number to cap attempts, or enter 0 to allow unlimited retakes once Allow Retake is turned on.
Can guests take a LearnPress exam without logging in?
Yes, the Allow Guest Attempts setting under Student Experience opens the exam to visitors without an account. Whether their results are saved for later review depends on the separate Save Guest Submissions toggle.
Conclusion
Configuring LearnPress exam time limits and retake policies comes down to four sections in the Settings tab: General for the timer and exam window, Attempts & Access for retakes and late access, Student Experience for how the timer feels to the student, and Display / Result for what they see afterward. Set those once, publish the exam, and the Submissions tab gives you a running record of exactly how students are using the time and attempts you’ve given them.
Read more: How to Create and Manage a Question Bank in LearnPress for Reusable Exams?