Setting up LearnPress properly is the first step to launching a successful online learning platform on WordPress. Whether you’re an educator, entrepreneur, nonprofits, or eLearning startup, configuring each setting correctly ensures a smooth experience for both students and instructors.
This guide walks you through all LearnPress settings tabs—General, Courses, Profile, Payments, Emails, Permalinks, Advanced, and Frontend Editor—with clear, step-by-step instructions to help you configure your LearnPress WordPress LMS settings effectively.
Table of Contents
LearnPress – WordPress LMS Plugin
We provide an amazing WordPress LMS plugin to create & sell online courses. Let’s find out!
Try NowWhy LearnPress Settings Matter
Before we dive into the actual setup, it’s important to understand the significance of configuring LearnPress settings properly. As with any LMS plugin, LearnPress serves as the central framework that governs your course website. These settings manage critical functions such as user registration, course presentation, and payment processing. Misconfigurations can result in a subpar user experience, disrupted course flows, or even failed transactions.
Let’s now explore the key areas of LearnPress settings:
- General Settings
- Courses Settings
- Profile Settings
- Payments Settings
- Email Settings
- Permalinks Settings
- Advanced Settings
- Frontend Editor
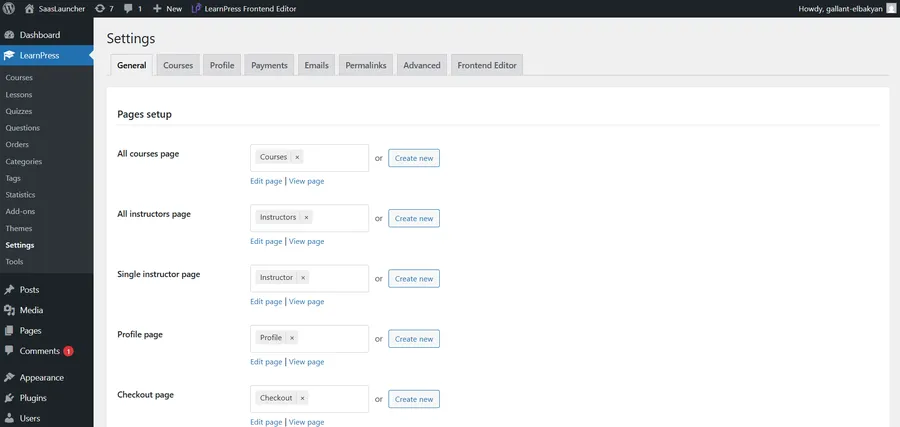
1. LearnPress General Settings
Go to: LearnPress → Settings → General
The LearnPress general settings tab is where you begin your journey in setting up your WordPress LMS settings.
Pages Setup:
Assign key pages:
- All Courses Page
- Checkout Page
- Profile Page
- Become an Instructor
- Terms and Conditions
You can also auto-create them if not available.
Currency:
Set your site’s currency (e.g., USD, EUR), position (left/right), and decimal formatting.
Other Options:
- Public profile: Allows user profile pages to be visible.
- Instructor registration: Enable signups for course creators.
- IP storage: Logs user IPs at checkout (for security or analytics).
This foundational setup is crucial for proper LearnPress settings operation.
2. Courses Settings
Go to: Settings → Courses
The LearnPress course setup tab allows you to define how your course builder presents courses and behaves.
Layout & Pagination:
- Choose layout style (Modern/List/Grid).
- Set number of courses per page.
- Choose pagination type: number or load more.
Course Behavior:
- Auto Start: Enrolls students immediately after purchase.
- Review Course: Enables review before publishing.
- Confirmation Popup: For course completion confirmation.
- Redirect URL after course finish.
Curriculum Display:
Choose how the curriculum opens by default (expand first section or all).
Materials & Upload:
- Define allowed file types (PDF, TXT, etc.)
- Limit file size and number of uploads.
Instructor List:
Set how many instructors appear per page and whether to show admin accounts.
With optimized LearnPress course setup, student navigation and student enrollment become more streamlined.

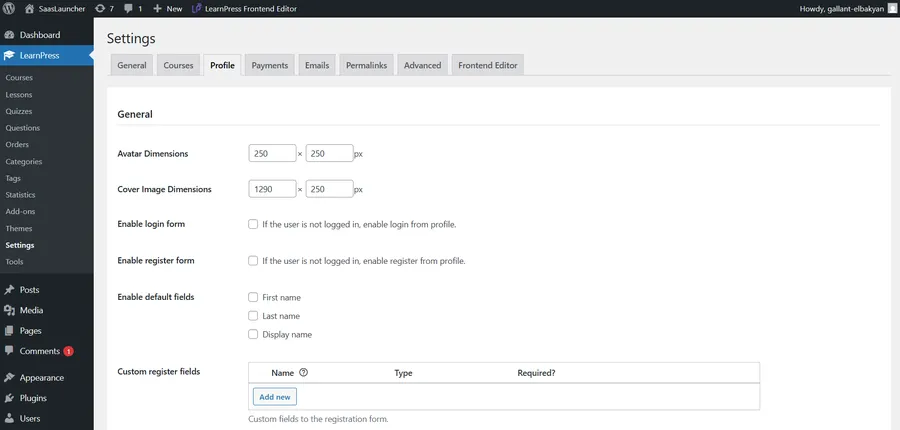
3. Profile Settings
Go to: Settings → Profile
This tab manages user profile appearance and registration.
Avatar & Cover Image:
Define default sizes for avatars and cover photos.
Login & Register:
Allow login/register forms directly from the profile page if the user isn’t logged in.
Default Fields:
Enable standard fields (First name, Last name, Display name).
Custom Registration Fields:
Add personalized fields to collect more data during sign-up.
This improves the online learning experience and supports instructor branding with visual customization options.
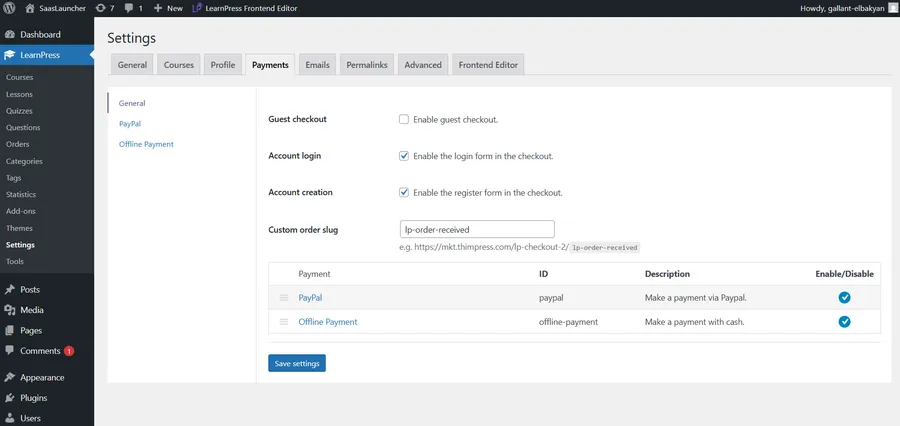
4. Payments Settings
Go to: Settings → Payments
General:
- Guest checkout: Allow purchases without account.
- Account login/creation: Show login/register form during checkout.
- Custom order slug: Customize order URL endpoint (e.g., /lp-order-received).
Supported Gateways:
- PayPal: Configure PayPal email & sandbox mode.
- Offline Payment: Enable cash or manual payments.
You can enable both and switch based on what fits your audience. Solid LearnPress payment setup is vital for managing student enrollment and scaling sales.
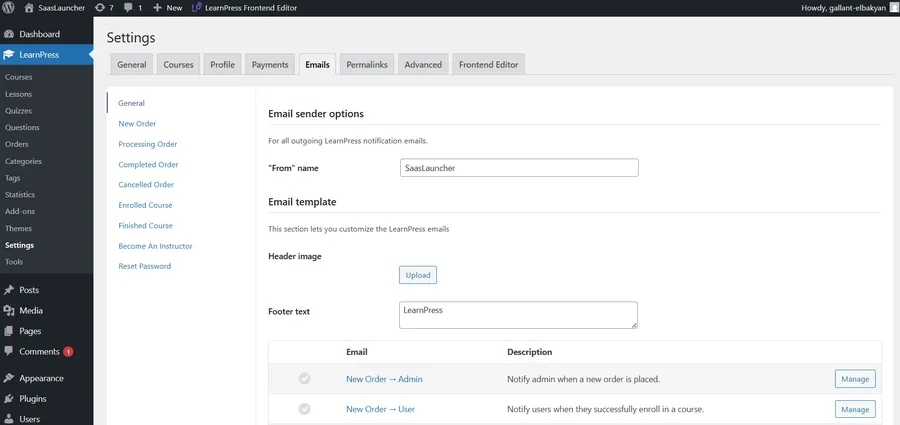
5. Email Settings
Go to: Settings → Emails
Sender Options:
- Set “From” name (e.g., your brand or site name).
- Upload email header image.
- Customize footer text.
Email Templates:
Control automated emails sent to:
- Admin (new order, enrollment)
- User (enrolled, completed, cancelled)
- Instructor (when a student joins or completes a course)
- Guests (if guest checkout is enabled)
Each email can be individually enabled, disabled, or managed.
6. Permalinks Settings
In LearnPress → Settings → Permalinks, the “Permalinks Course” section allows you to customize how your course URLs appear. Choosing the right permalink structure improves SEO, makes URLs more user-friendly, and helps learners navigate your site easily.
Here’s a breakdown of each option:
Permalinks Course
1. Course
- Example URL:
https://yourdomain.com/course/sample-course/ - Description:
This is the most basic and clean structure. Each course URL starts with/course/followed by the course slug. - When to Use:
Ideal if you want simple, clean, and short URLs. It’s great for small sites or single-topic course sites without complex categorization.
2. Courses Base
- Example URL:
https://yourdomain.com/courses-3/sample-course/ - Description:
Similar to the first option, but with a custom prefix like/courses-3/instead of/course/. The suffix “3” is often auto-generated by WordPress to avoid conflicts with existing pages. - When to Use:
Useful if the slug/courseis already taken by another page or if you want a more distinctive structure.
3. Courses Base with Category
- Example URL:
https://yourdomain.com/courses-3/course-category/sample-course/ - Description:
Adds the course category to the URL path. This creates a more hierarchical and SEO-friendly structure that clearly shows content relationships. - When to Use:
Best for websites with multiple course categories (e.g., Marketing, Design, Development). It helps both users and search engines understand the course structure better.
4. Custom Base
- Example URL (if you set
/learning):https://yourdomain.com/learning/sample-course/ - Description:
This lets you define your own prefix for course URLs. You can use branding, a local language (e.g., /pathshala/ for Hindi in India), or a keyword you want to target. - When to Use:
Great for personal branding, language localization, or SEO-specific URL customization.
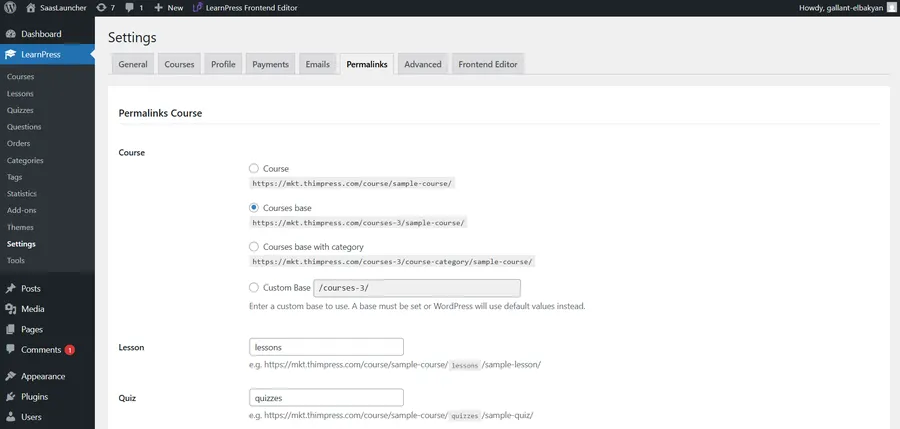
After setting up the main course permalinks, it’s important to configure additional URL structures for your lessons, quizzes, course taxonomies, and profile dashboard. Doing this will ensure a clean, user-friendly, and SEO-optimized site structure for your online learning platform.
Lesson Permalink
- Field name:
lessons - Example URL:
https://yourdomain.com/course/sample-course/lessons/sample-lesson/ - What it does:
Defines the URL slug for individual lesson pages inside a course. - Best practice:
Keep it short and relevant. The default “lessons” is clear, but you can also use something likemodulesorunitsif it fits your content style better.
Quiz Permalink
- Field name:
quizzes - Example URL:
https://yourdomain.com/course/sample-course/quizzes/sample-quiz/ - What it does:
Sets the path used for quizzes within courses. - Best practice:
Keep it simple. You could change it totestsorexamsbased on your course format.
Category Base
- Field name:
course-category - Example URL:
https://yourdomain.com/course/course-category/sample-category/ - What it does:
Sets the prefix for course category pages. Useful if you group courses by subject (e.g., Design, Development, Business). - Best practice:
Keep it short and keyword-rich. You can rename it to something liketopicsorsubjectsfor clarity.
Tag Base
- Field name:
course-tag - Example URL:
https://yourdomain.com/course/course-tag/sample-tag/ - What it does:
Determines the URL structure for course tags, which are used for secondary filtering or labeling. - Best practice:
Usetagsorlabels—whichever suits your tagging logic and platform language.
Profile Permalinks
These settings control the URLs inside the user dashboard, where learners and instructors manage their courses, quizzes, orders, and account preferences.
Here’s what each field does:
Courses
- Field name:
courses - Example URL:
https://yourdomain.com/profile/username/courses - Purpose:
Lists all courses created by the user (typically for instructors).
My Courses
- Field name:
my-courses - Example URL:
https://yourdomain.com/profile/username/my-courses - Purpose:
Lists all courses enrolled by the user (students).
Quizzes
- Field name:
quizzes - Example URL:
https://yourdomain.com/profile/username/quizzes - Purpose:
Shows completed or active quizzes for the user.
Orders
- Field name:
orders - Example URL:
https://yourdomain.com/profile/username/orders - Purpose:
Displays a list of course purchase orders.
Order Details
- Field name:
order-details - Example URL:
https://yourdomain.com/profile/username/order-details/123 - Purpose:
Shows the details of a specific order by ID.
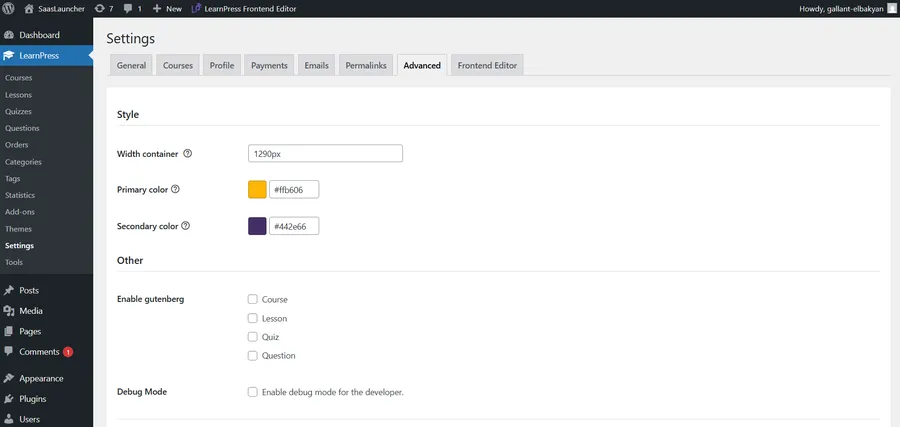
7. Advanced Settings
Go to: Settings → Advanced
Style:
- Set container width (e.g., 1290px)
- Choose primary and secondary colors to match your theme branding.
Gutenberg Compatibility:
Enable/disable Gutenberg editor for different content types like courses, lessons, and quizzes.
Debug Mode:
Enable this only when troubleshooting development-related issues.
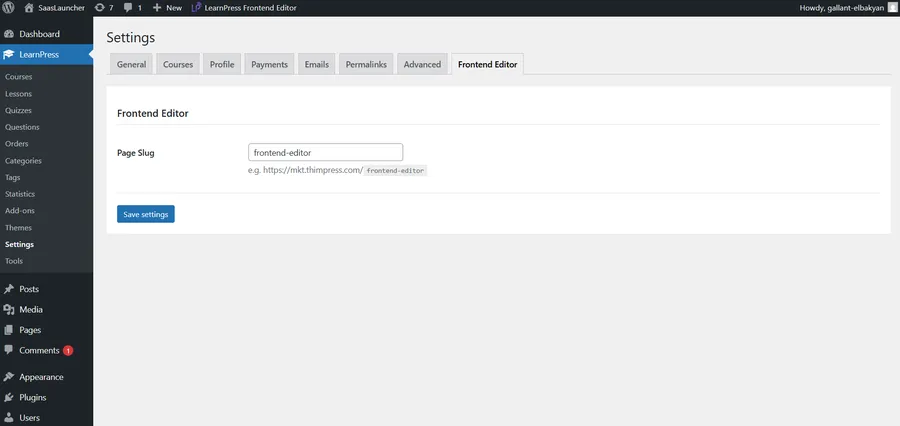
8. Frontend Editor
Go to: Settings → Frontend Editor
Set the page slug for your frontend course editor (e.g., /frontend-editor), which allows instructors to edit or create courses without accessing the backend dashboard.
This is ideal for platforms allowing multi-instructor access.
Final Thoughts
Configuring your LearnPress settings properly ensures that your LMS plugin runs reliably across every touchpoint—from course setup, payment collection, to profile and email management.
Once you’ve fully configured LearnPress general settings, LearnPress course setup, and LearnPress payment setup, your WordPress LMS settings are production-ready for your next batch of student enrollment.
🔔 Pro Tip: After configuring, simulate a full user journey (login → enroll → pay → complete course) to catch potential errors before going live.
FAQs About LearnPress Settings
Q1. What is LearnPress?
LearnPress is the powerful WordPress LMS plugin designed as a complete learning management solution for Educators, Learners, and Organizations. Built specifically for WordPress, it ensures seamless integration, allowing you to easily create online courses and manage your WordPress education platform.
Q2. How do I allow users to register as instructors?
Go to Settings → General, and enable “Instructor Registration”. Then make sure the Become an Instructor page is correctly assigned and linked in your navigation.
Q3. Why aren’t users receiving email notifications?
Go to Settings → Emails, make sure the relevant templates (like "Enrolled Course – User") are enabled. Also, ensure your WordPress site has proper SMTP setup to avoid delivery failures.
Read more: LearnPress Free vs Pro: Which version is better?
Contact US | LearnPress:
Website: https://learnpresslms.com/
Fanpage: https://www.facebook.com/learnpresslms
Email: [email protected]