Running an online academy requires organization, dedication, and the right technical tools. In the past, educators faced a major hurdle. To see exactly who was taking a class, you had to dig through complex WooCommerce order menus.
Thankfully, this outdated process is over. The new LearnPress enrolled students list completely changes how you oversee your digital classroom.
If you have ever wondered how to manage students in LearnPress without wasting hours, this native feature is your absolute best solution. It brings clarity and speed directly to your daily workspace.
Effective LearnPress course management starts with clear visibility. In this comprehensive guide, we will explore everything you need to know about this major update. You will learn how to navigate the interface, filter data, and ensure your learners succeed from day one.
Table of Contents
LearnPress – WordPress LMS Plugin
We provide an amazing WordPress LMS plugin to create & sell online courses. Let’s find out!
Try NowWhy the LearnPress Enrolled Students List Matters
Proper LearnPress course management is the foundation of a profitable and sustainable online school. When you have hundreds of learners, you cannot rely on messy spreadsheets or basic sales receipts to understand your audience.
Instructors need immediate access to real-time educational data. They must know who is falling behind, who just signed up, and who recently graduated.
The LearnPress enrolled students list provides a centralized, easy-to-read hub for all this critical information. By utilizing this built-in tool, you save hours of administrative work each week.
When you need to track student progress LearnPress provides the exact metrics you need instantly. You no longer have to cross-reference multiple screens.
Instead of acting as a database manager, you can focus purely on teaching. Furthermore, having a dedicated LearnPress student dashboard ensures that your data remains secure and organized. This shift is essential for growing a reliable eLearning business on open-source platforms like WordPress, especially after installing LearnPress and configuring your initial setup.
Step 1: Accessing the Backend Interface
The very first step in mastering how to manage students in LearnPress is finding the actual interface. The development team designed this area to be as accessible and intuitive as possible.
If you are an administrator or a teacher with backend access, logging in is incredibly simple. First, navigate to your main WordPress administration panel.
Look at the dark, left-hand menu and locate the main LMS plugin tab. Click on it to expand the various options. Near the bottom of that specific submenu, click directly on the “Enrolled Students” tab.
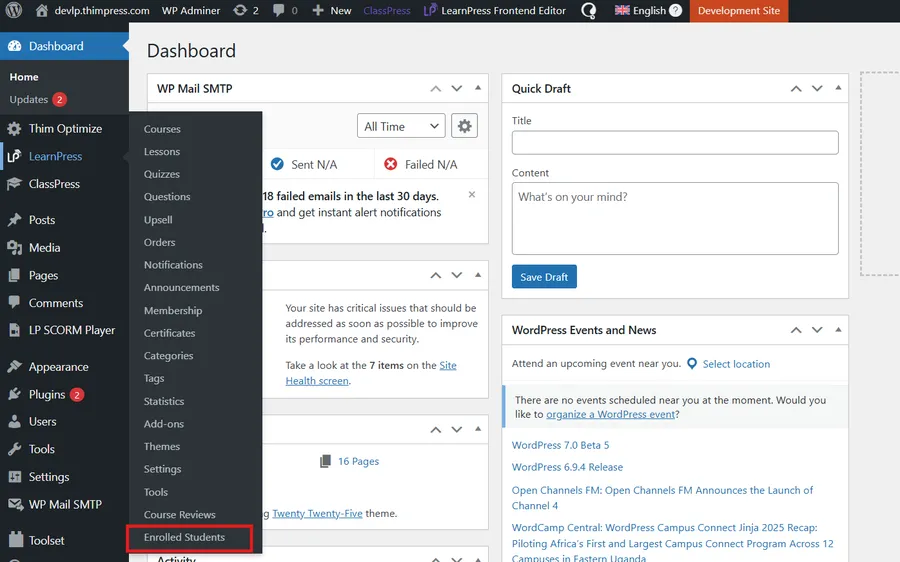
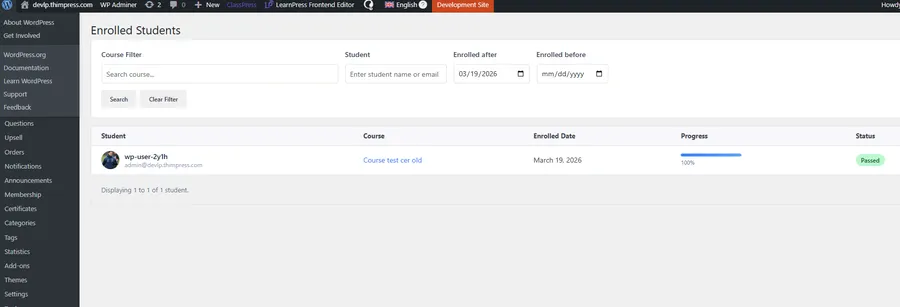
Instantly, the system will load the LearnPress enrolled students list. You will see a clean, highly organized table displaying user avatars, names, course titles, enrollment dates, and current statuses.
Exploring this LearnPress student dashboard for the first time will immediately show you the power of native integration. Everything is exactly where it should be.
Step 2: Utilizing the LearnPress Student Dashboard on the Frontend
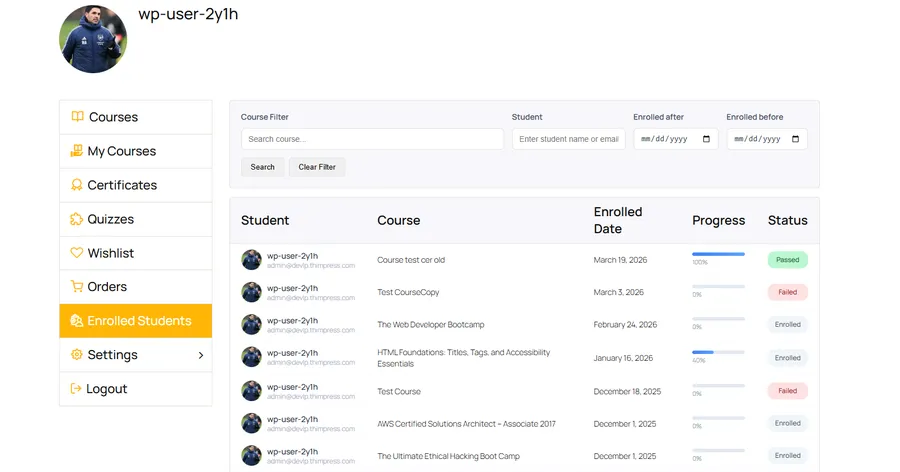
Not every instructor has or needs access to the deep WordPress backend. In fact, keeping users out of the backend is a smart security practice. Therefore, the LearnPress student dashboard is also fully available on the frontend website.
This specific layout is incredibly useful for freelance teachers or guest instructors. They only need to see the participants in their specific classrooms, not the entire website settings.
To view this, simply navigate to your website’s homepage. Log in using your registered instructor credentials.
Next, click on your Profile page. In the left-hand navigation menu of your profile, you will see a dedicated tab for enrolled learners.
When instructors ask how to manage students in LearnPress safely, this frontend profile is the perfect answer.
Clicking this tab reveals the exact same powerful LearnPress enrolled students list right on the frontend. The design remains consistent, professional, and entirely separated from complicated backend administration menus and core LearnPress settings.
Step 3: Mastering the Advanced Filtering System
As your digital academy grows, scrolling manually through pages of users becomes impossible. A core feature of modern LearnPress course management is the ability to sort information quickly.
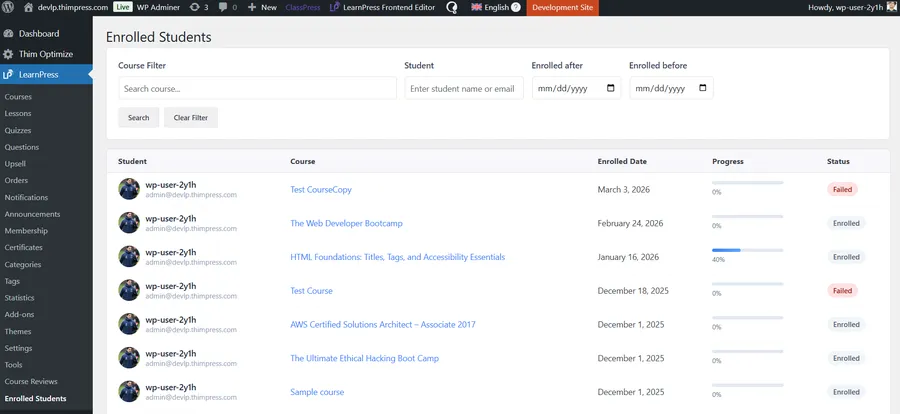
At the very top of the dashboard, you will find several powerful search fields. First, there is the “Search course” box. Typing a few letters here instantly isolates learners belonging to a specific curriculum.
Next, you can use the targeted name or email search bar. If a specific user contacts you for support, you can type their email here to immediately locate their profile and history.
Finally, the dashboard offers a precise date filter. You can sort users by an “Enrolled after” or “Enrolled before” date limit.
For example, if you want to see everyone who joined your November cohort, simply input the start and end dates of November. The LearnPress enrolled students list will instantly refresh to show only that specific group of people.
Once you understand these filters, mastering how to manage students in LearnPress becomes second nature, perfectly complementing your course-building efficiency.
Step 4: How to Visually Monitor Learner Success
Educational data is only useful if you can understand it at a single glance. If you want to track student progress LearnPress makes it incredibly visual and straightforward.
Look at the right side of the data table. You will notice a clear, highly visible progress bar for every single user.
This horizontal bar represents the percentage of lessons and quizzes the user has successfully completed. It ranges smoothly from 0% to a full 100%.
Whenever you track student progress LearnPress immediately highlights who is succeeding and who is struggling. If an instructor notices a user stuck at 20% for three weeks, they can send a proactive email offering help.
This simple visual cue drastically reduces course abandonment rates and helps boost engagement by allowing instructors to intervene early. These color-coded badges offer instant clarity regarding the user’s current situation.
[Insert Image 2 Here: The main table showing students, progress bars, and status badges]
Image Alt Text: Visual progress bars inside the LearnPress enrolled students list.
Understanding the Three Core Status Tags
To maximize your LearnPress course management efficiency, you must understand the three distinct status badges provided by the system. These tags are automatically updated as learners interact with your content.
First, the gray “Enrolled” tag indicates that the user has successfully purchased or registered for the class. However, they have not yet met the requirements to finish. They are currently active.
Second, the green “Passed” tag is a mark of ultimate success. It means the user has completed all mandatory lessons, passed the required quizzes, and reached a 100% completion rate.
Third, the red “Failed” tag serves as an important alert. This indicates that the learner attempted the final assessments but did not achieve the minimum passing grade defined in your settings.
By utilizing these three simple tags within the LearnPress student dashboard, administrators never have to guess who needs a certificate and who needs a retake.
Best Practices for Managing Your Digital Classroom
Having a powerful administrative tool is wonderful, but using it correctly is what truly creates educational success. Make it a habit to check your LearnPress enrolled students list at least twice a week.
Set aside fifteen minutes every Monday morning to filter your latest sign-ups. Send them a warm, automated welcome message to build early engagement.
On Fridays, use the intuitive progress bar to track student progress LearnPress style. Identify those who have recently earned the green “Passed” tag and ensure their graduation materials are prepared.
If you notice many users receiving the red “Failed” tag on a specific course, treat it as constructive feedback. It might indicate that your quiz questions are too difficult or your course structure lacks clarity.
Learning how to manage students in LearnPress is not just about organizing data. It gives you insights to develop new online course ideas based on real user behavior. Your LearnPress course management strategy directly impacts your overall revenue and brand reputation.
A New Era of eLearning Administration
The frustrating days of complicated third-party tracking are finally over. Managing an online school should be a streamlined, rewarding experience for everyone involved.
By fully implementing the native LearnPress student dashboard, you are taking a massive step toward professionalizing your academy. You regain absolute control over your data, your valuable time, and your students’ ultimate success.
The combination of frontend access, smart date filtering, and visual progress tracking makes this update an absolute necessity.
Take a moment today to explore the LearnPress enrolled students list on your own website. Practice using the advanced filters, analyze the individual progress bars, and experience the speed of native course tracking.
When you simplify your workflow and effectively track student progress LearnPress gives you more room to inspire, educate, and grow your digital classroom to its highest potential.
FAQs About LearnPress Enrolled Students List
Q1: How do I access the LearnPress enrolled students list?
A: You can access the list in two ways. Administrators can find it in the WordPress backend by navigating to the main LearnPress menu and clicking on the "Enrolled Students" tab. Alternatively, instructors can view the LearnPress student dashboard directly on the frontend by logging into their profile page.
Q2: Can I filter students by a specific course or date?
A: Yes! The new advanced filtering system allows you to easily sort your data. You can search for a specific course name, look up a learner's email, or use the date filters to see who enrolled before or after a certain time. This makes how to manage students in LearnPress incredibly fast and efficient.
Q3: How do I know if a student is falling behind?
A: The dashboard features a visual progress bar for every learner. When you need to track student progress LearnPress displays exactly what percentage of the course they have completed (from 0% to 100%). It also uses color-coded status tags (Enrolled, Passed, or Failed) so you can intervene and help struggling students immediately.
Q4: Is the enrolled students list feature free?
A: Yes, the native enrolled students dashboard is a core feature introduced in LearnPress v4.3.3. It is built directly into the free plugin to help instructors improve their LearnPress course management without needing to rely on third-party tracking tools or WooCommerce order menus.
Read more: Interactive Online Learning: 5 Amazing LearnPress Tips
Contact US | LearnPress:
Website: https://learnpresslms.com/
Fanpage: https://www.facebook.com/learnpresslms
Email: [email protected]